Table of Contents
What is Tailscale? #
Tailscale is what is now known as a "software-defined mesh VPN", which really doesn't tell us much other than what terms to search for to find similar software. Nonetheless, Tailscale is a key part in the tapestry of modern software that makes our extremely effective homelab server possible. Tailscale is going to be the thing that makes all the necessary connectivity possible for us without having to forward ports on a static home IP or paying for a VPS (or something similar) to act as a central router.
It should be noted that there are several other software-defined mesh VPN products out there, some of which are self-hostable, that you may prefer. That's perfectly fine. I am not trying to put Tailscale on a pedestal so much as I am trying to illustrate what these systems can do for us, and Tailscale is the one I know. Any similar system should be able to do similar things and solve similar problems for us.
The World Before Tailscale #
Note: Feel free to skip to the Setup section it if you already have a good understanding of what Tailscale does and why you want to use it.
To really understand what Tailscale does for us, we need to consider the world before Tailscale or any other similar systems (NetBird, Pangolin, Headscale). We want to self-host some web apps, and we want to have the power to configure the following properties:
- We want HTTPS everywhere, on the LAN (local network), WAN (the wider internet), and within our own VPN1.
- We want to be able to host multiple web apps on the same machine and the same LAN.
- We want to be able to make some of those apps accessible only on the LAN (for everyone inside our home network), others only on the VPN (for all authorized VPN users), and yet others accessible across the wider internet.
- e.g. Immich: A photo management website similar to iCloud Photos or Google Photos. This is something we may want to be accessible via a VPN, because we may want to share it with family members who don't live in the same home, but we don't want something like photos to be accessible from the wider internet. We may also want lower security standards for the web app itself in order to facilitate use by less than tech-savvy family members, and thus security would be provided by the VPN software.
- e.g. MicroBin: A paste-bin type software which is most useful when its accessible to anyone so that you can send files to them and vice versa. As such, we would want this to be accessible to the wider internet (WAN).
- e.g. OctoPrint: A management system for 3D printers. We would only want this accessible from the LAN, because software that manages a 3D printer should only be accessible to those who have physical access to it.
These requirements may sound reasonable and coherent, but doing this properly without something like Tailscale is in fact very difficult. There are many approaches, but for brevity, I will focus on just one that illustrates how complicated all this is:
- First, we have to set up a Wireguard VPN. Wireguard is point-to-point, however, which means it needs ports to connect to, but we don't want to open ports and we might not even have a static IP from our ISP. So we have to get a VPS with some cloud provider, and use that as the central routing node of the whole network because that has a static IP and ports.
- We immediately run into a problem though - all the traffic goes through the routing VPS, which means that even when you're at home and want to transfer a large file with the VPN turned on to another machine at home, its going to go from your house to the VPS somewhere, and then back to your house, which is always going to be much slower than simply inside your LAN. We can try to deal with this in three basic ways:
- By having several wireguard configurations (or file transfer connection configurations) for mobile devices which we switch between depending on where we are and what we are doing.
- By writing custom automation to switch up our network configuration depending on network conditions (which is relatively easy on one machine, but very difficult on a phone and a laptop, for example).
- By sucking it up and just sending everything through the router, no matter how slow.
- We then run into another problem: Wireguard configurations are managed on-device, which means that anyone other than yourself who's using your VPN, needs to have you constantly futzing around with their phone to get the VPN configuration working "just right" and updates for any configuration changes are functionally manual.
- Then we have to set up a proxy server to handle access to all our web apps. In my case, I used Caddy because that had built-in Let's Encrypt integration which made HTTPS for the wider internet easier. Immediately, there is another set of problems to solve:
- This proxy server needs to run somewhere that is accessible on the VPN and on the WAN. On the LAN, we can run Caddy on the same server as the WebApp.
- We need to handle our own DNS for LAN/VPN-accessible web apps.
- Let's Encrypt gives us certificates for WAN-accessible apps, but its MUCH more difficult to get it to give us certificates for our own custom domains inside our VPN/WAN, so we have to maintain our own certificate authority and feed those certificates to Caddy proxies wherever they're installed.
- Having our own Certificate Authority means that we have to install that certificate authority on all our clients, which is very difficult to do on a client-by-client basis as people change devices, etc.
Don't get me wrong, all of this is doable, and you may even want to do parts of this for your self-hosted setup anyway, but this is a LOT of problems to solve just to consistently host a web app. That's where Tailscale comes in...
The World After Tailscale #
Note: Feel free to skip this section and go directly to setup if you already have a good understanding of what Tailscale does and why you want to use it.
So what does Tailscale do for us?
- Tailscale provides a VPN "overlay network" called a "Tailnet" that has consistent clients for Windows, MacOS, Linux, Android and iOS, which we can use across all our servers and personal devices.
- This overlay network, as any VPN should, provides all devices with consistent IP addresses in the
100.XXX.XXX.XXXrange at which they can access each other directly.
- This overlay network, as any VPN should, provides all devices with consistent IP addresses in the
- Tailscale continuously optimizes your network connection. It connects directly between devices when it can (such as when they're on the same LAN) for all different types of connection tasks (web traffic, SSH, file transfers, etc), which eliminates the "I have to either suffer slow connections, or keep reconfiguring Wireguard" problem.
- Tailscale provides two key functions: Funnel and Serve (more on that below) which allow us to host web apps on the WAN and VPN respectively. Critically, these functions are integrated with Let's Encrypt to provide HTTPS proxying by default without you having to manage your own certificate authority. This works both on the WAN and on your Tailnet.
- Tailscale even has other functionality which doesn't solve any problems listed above, but is nonetheless extremely useful:
- TailDrop: Which can be used to send files between machines on the same Tailnet.
- Tailscale SSH: Which helps manage consistent SSH connections with access controls.
And just like that, several classes of problems are eliminated. Because of this, Tailscale (and other systems like it) are a key tool for the self-hoster to keep everything connected without a huge amount of work.
Setup #
Assuming that you're convinced that Tailscale is the way to go, now we want to get away from the "theory" of why this is so cool and actually use it. We are going to:
- Set up a Tailscale account.
- We're going to install Tailscale on our server, and at least one other client device (probably a personal computer of some kind).
- We're going to configure and try out SSH access via Tailscale, which should hopefully eliminate the need for a static IP for your server on your LAN.
- We're going to look into DNS management and set up a "Tailnet Domain".
- Finally, we're going to take a quick look into Mullvad VPN Integration. After this, we should have our machines accessible within the same tailnet via SSH and we should be ready (at least from a networking perspective) to self-host any number of web apps.
Account Setup #
Assuming you have an account with an OpenID provider listed on the Tailscale Sign-up page, you should be able to create an account by simply clicking on the appropriate provider and signing-in/authorizing Tailscale as prompted. Personally, I created a GitHub account and then used that to log into Tailscale just for this series of blog posts.

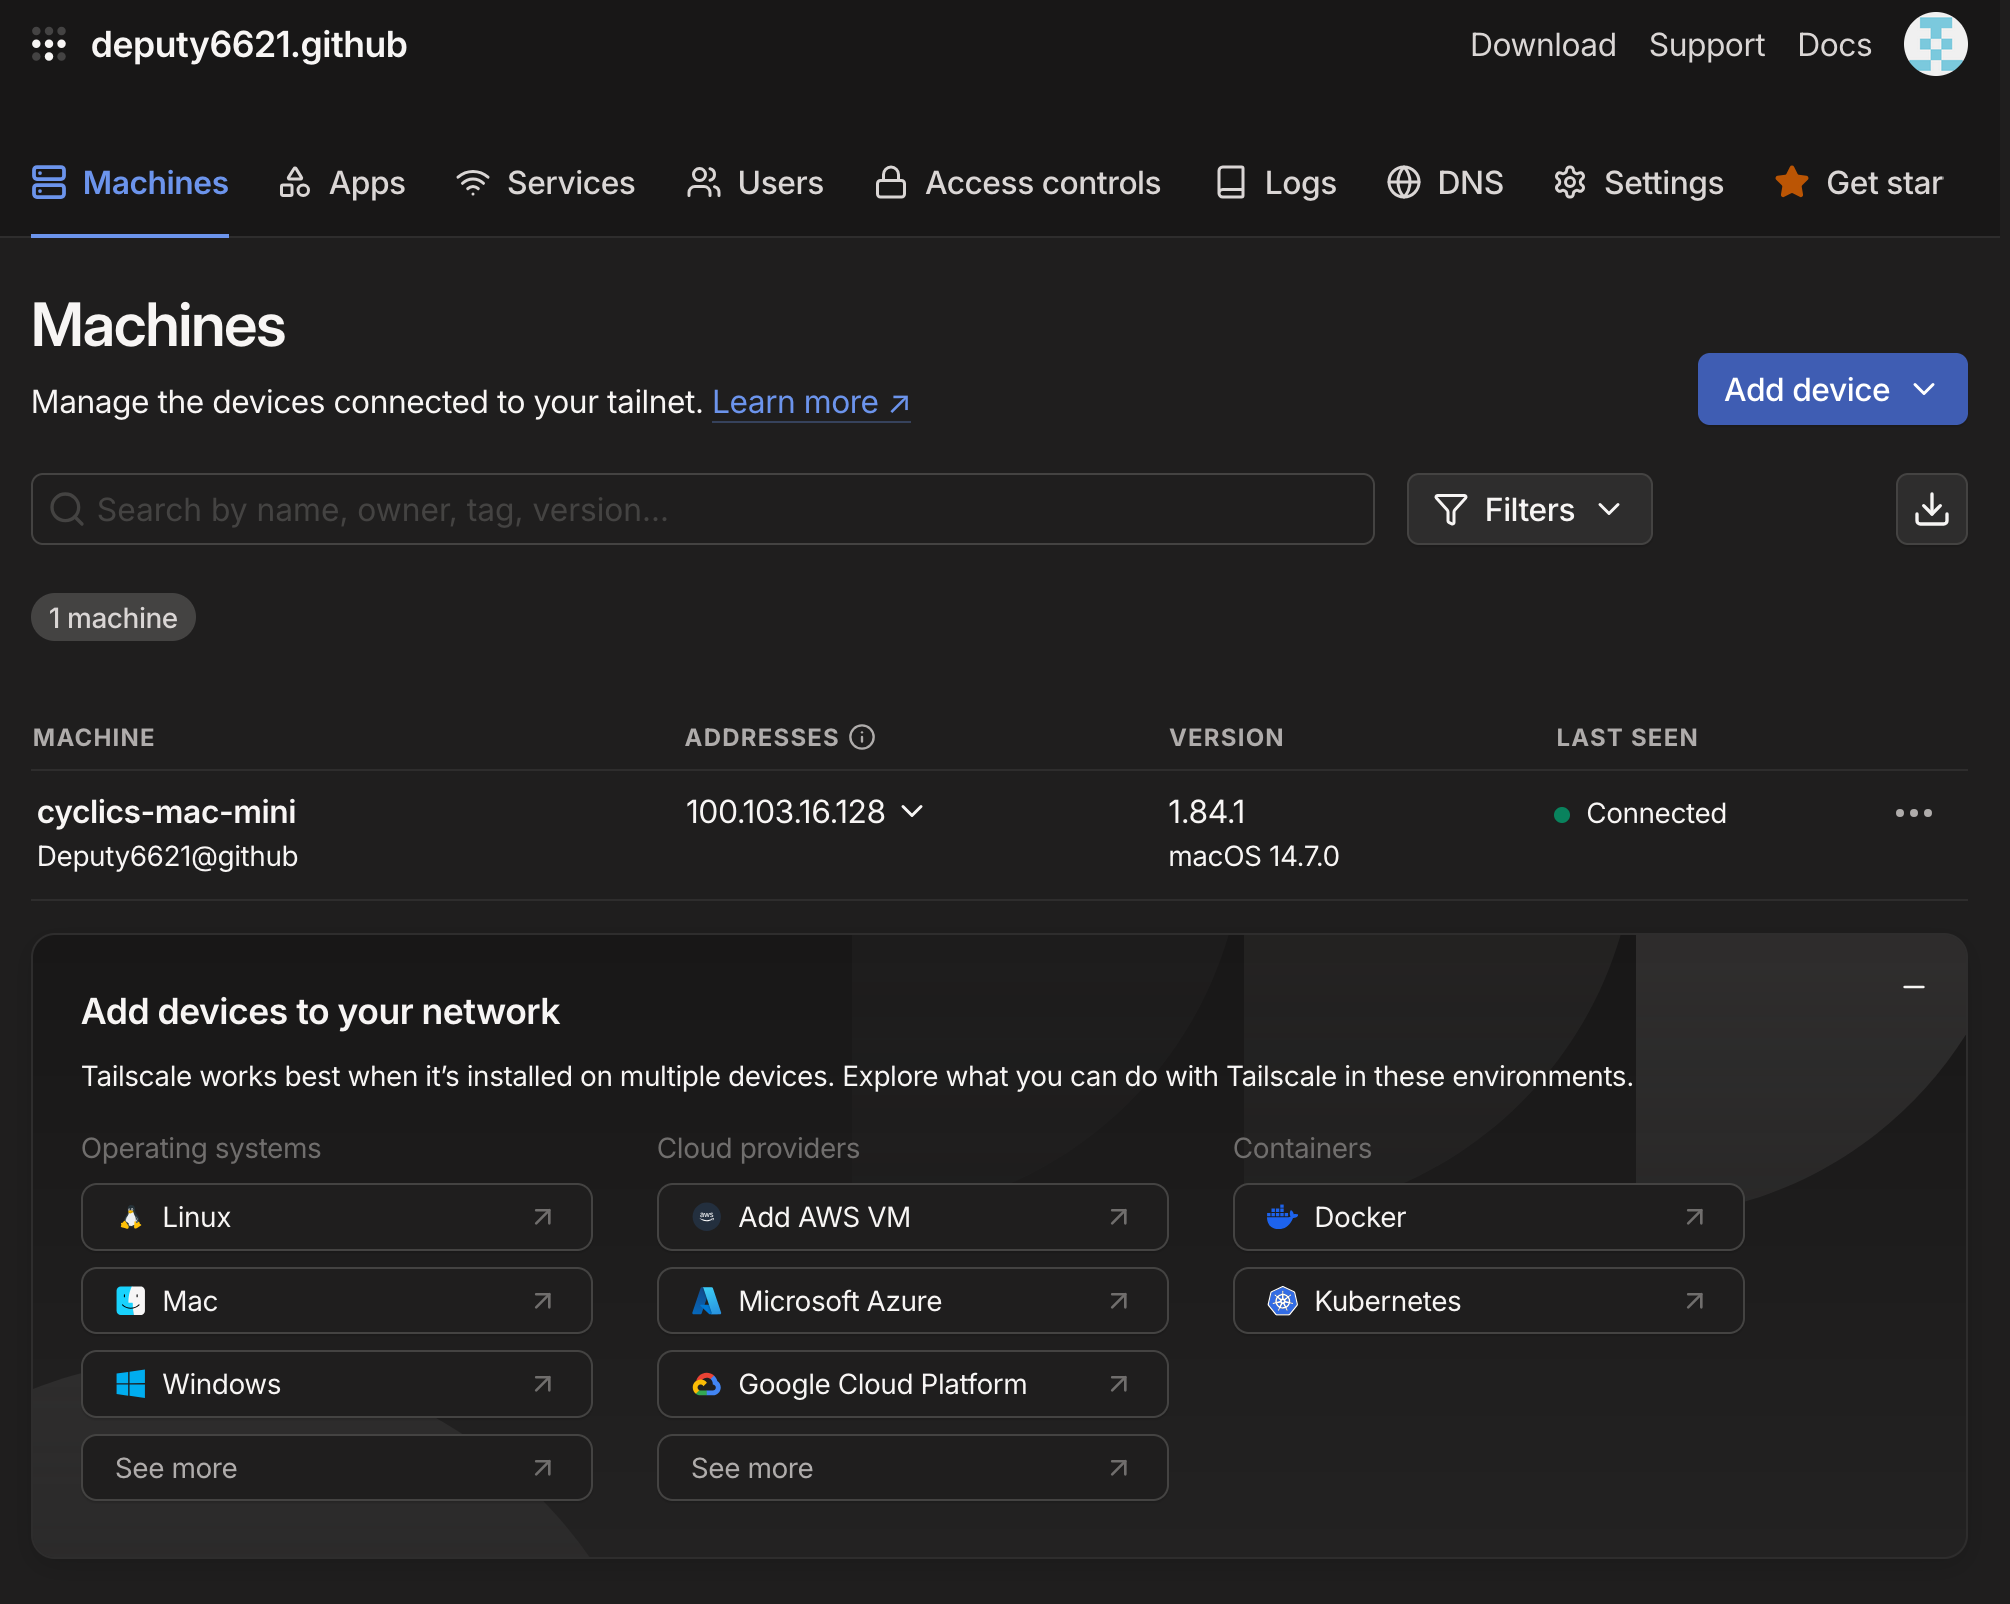
You will then be prompted a bunch of stuff that doesn't really matter (such as how you plan to use Tailscale, etc) and quickly you will be sent to a page that says "add your first device". This should be your personal machine, the one you're doing the work on (assuming that you're SSH-ing into the self-hosted server you're setting up). In my case, it was a Mac, which I added as cyclics-mac-mini, but you will have to follow the relevant instructions for whatever OS you happen to be using2.
Once you have a device connected, frankly, the rest of the introduction doesn't matter and you can skip it (link at the bottom). What we really care about the Machines view: https://login.tailscale.com/admin/machines which we're going to need in the next section.
Privacy Concerns #
Third-party Control of Accounts
Something that might jump out at you, is that Tailscale does not have a simple password login like many other sites. They are clearly farming the work of handling authentication to companies like Google, Apple, and Microsoft (GitHub). This might concern you because you're effectively handing control of something central to your network security to a massive corporation like the above. What can you do about this?
If you want an account which those corporations do not control, do the following:
- Create a Tailscale account with GitHub (preferably one not tied to you as mentioned above).
- Invite an arbitrary user (yourself) to the Tailnet (by email, any email). Log in via the invite link, and set it up with a Passkey rather than any of the aforementioned corporate options. Make the user the admin of the Tailnet. Congratulations, if you followed the linked instructions, you should have a passkey-authenticated Tailscale administrative account that does not rely on any of the aforementioned corporations for its security.
Trusting Tailscale
There is another problem, however, that you have to reason about for yourself - By setting yourself up to use Tailscale like this, it kinda undermines some of the privacy and security benefits of self-hosting. All your network traffic is essentially being controlled by a single entity which could enshittify at any moment. This is far from ideal. You have two choices:
- You can either trust Tailscale to not do bad things, or at least give you sufficient notice that they are about to do said bad things.
- You can go for a self-hosted alternative to Tailscale such as Headscale.
Ultimately, the reason I opted to go with Tailscale is two-fold: Firstly, I do find them trustworthy - many people who work at Tailscale have written other software (like sshuttle) which I trust and have used for a long time. Secondly, I think of this as a learning process and consider progress to be more important than perfection. I think that for someone who is learning how to self-host for themselves, they just need a manageable place to get started and Tailscale makes the networking complexity manageable. Once you have a good understanding of what you're doing, you can make the choice for yourself as to how you want to manage your own network.
Linux Setup #
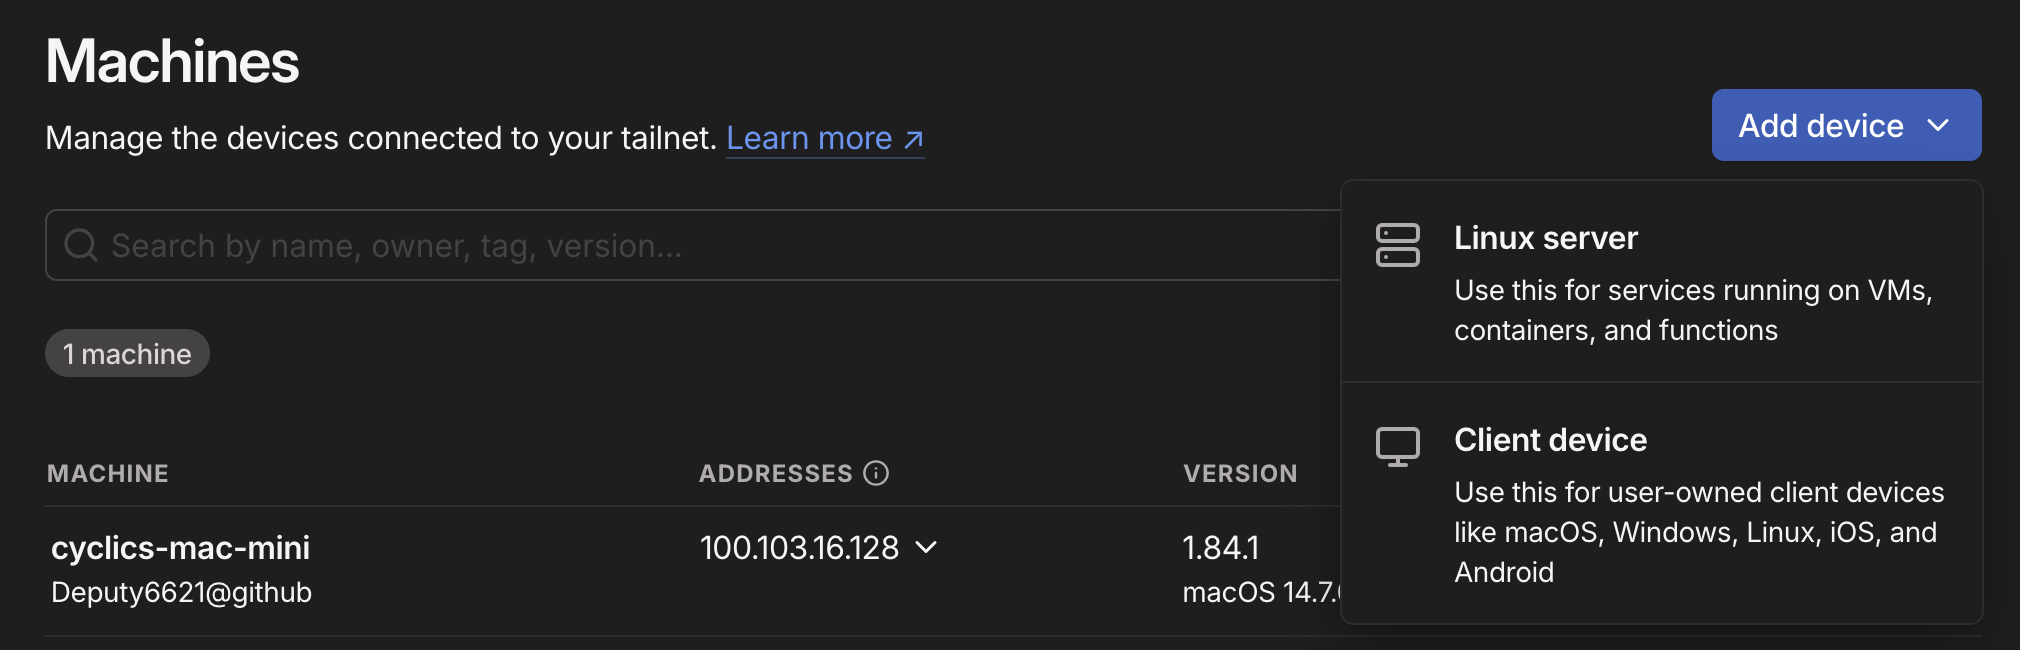
Now that we have our first personal device connected, we need to connect our Linux server to our Tailnet so that we can easily connect to it. This is easy to do from the Machines View by clicking "Add Device" and "Linux Server":
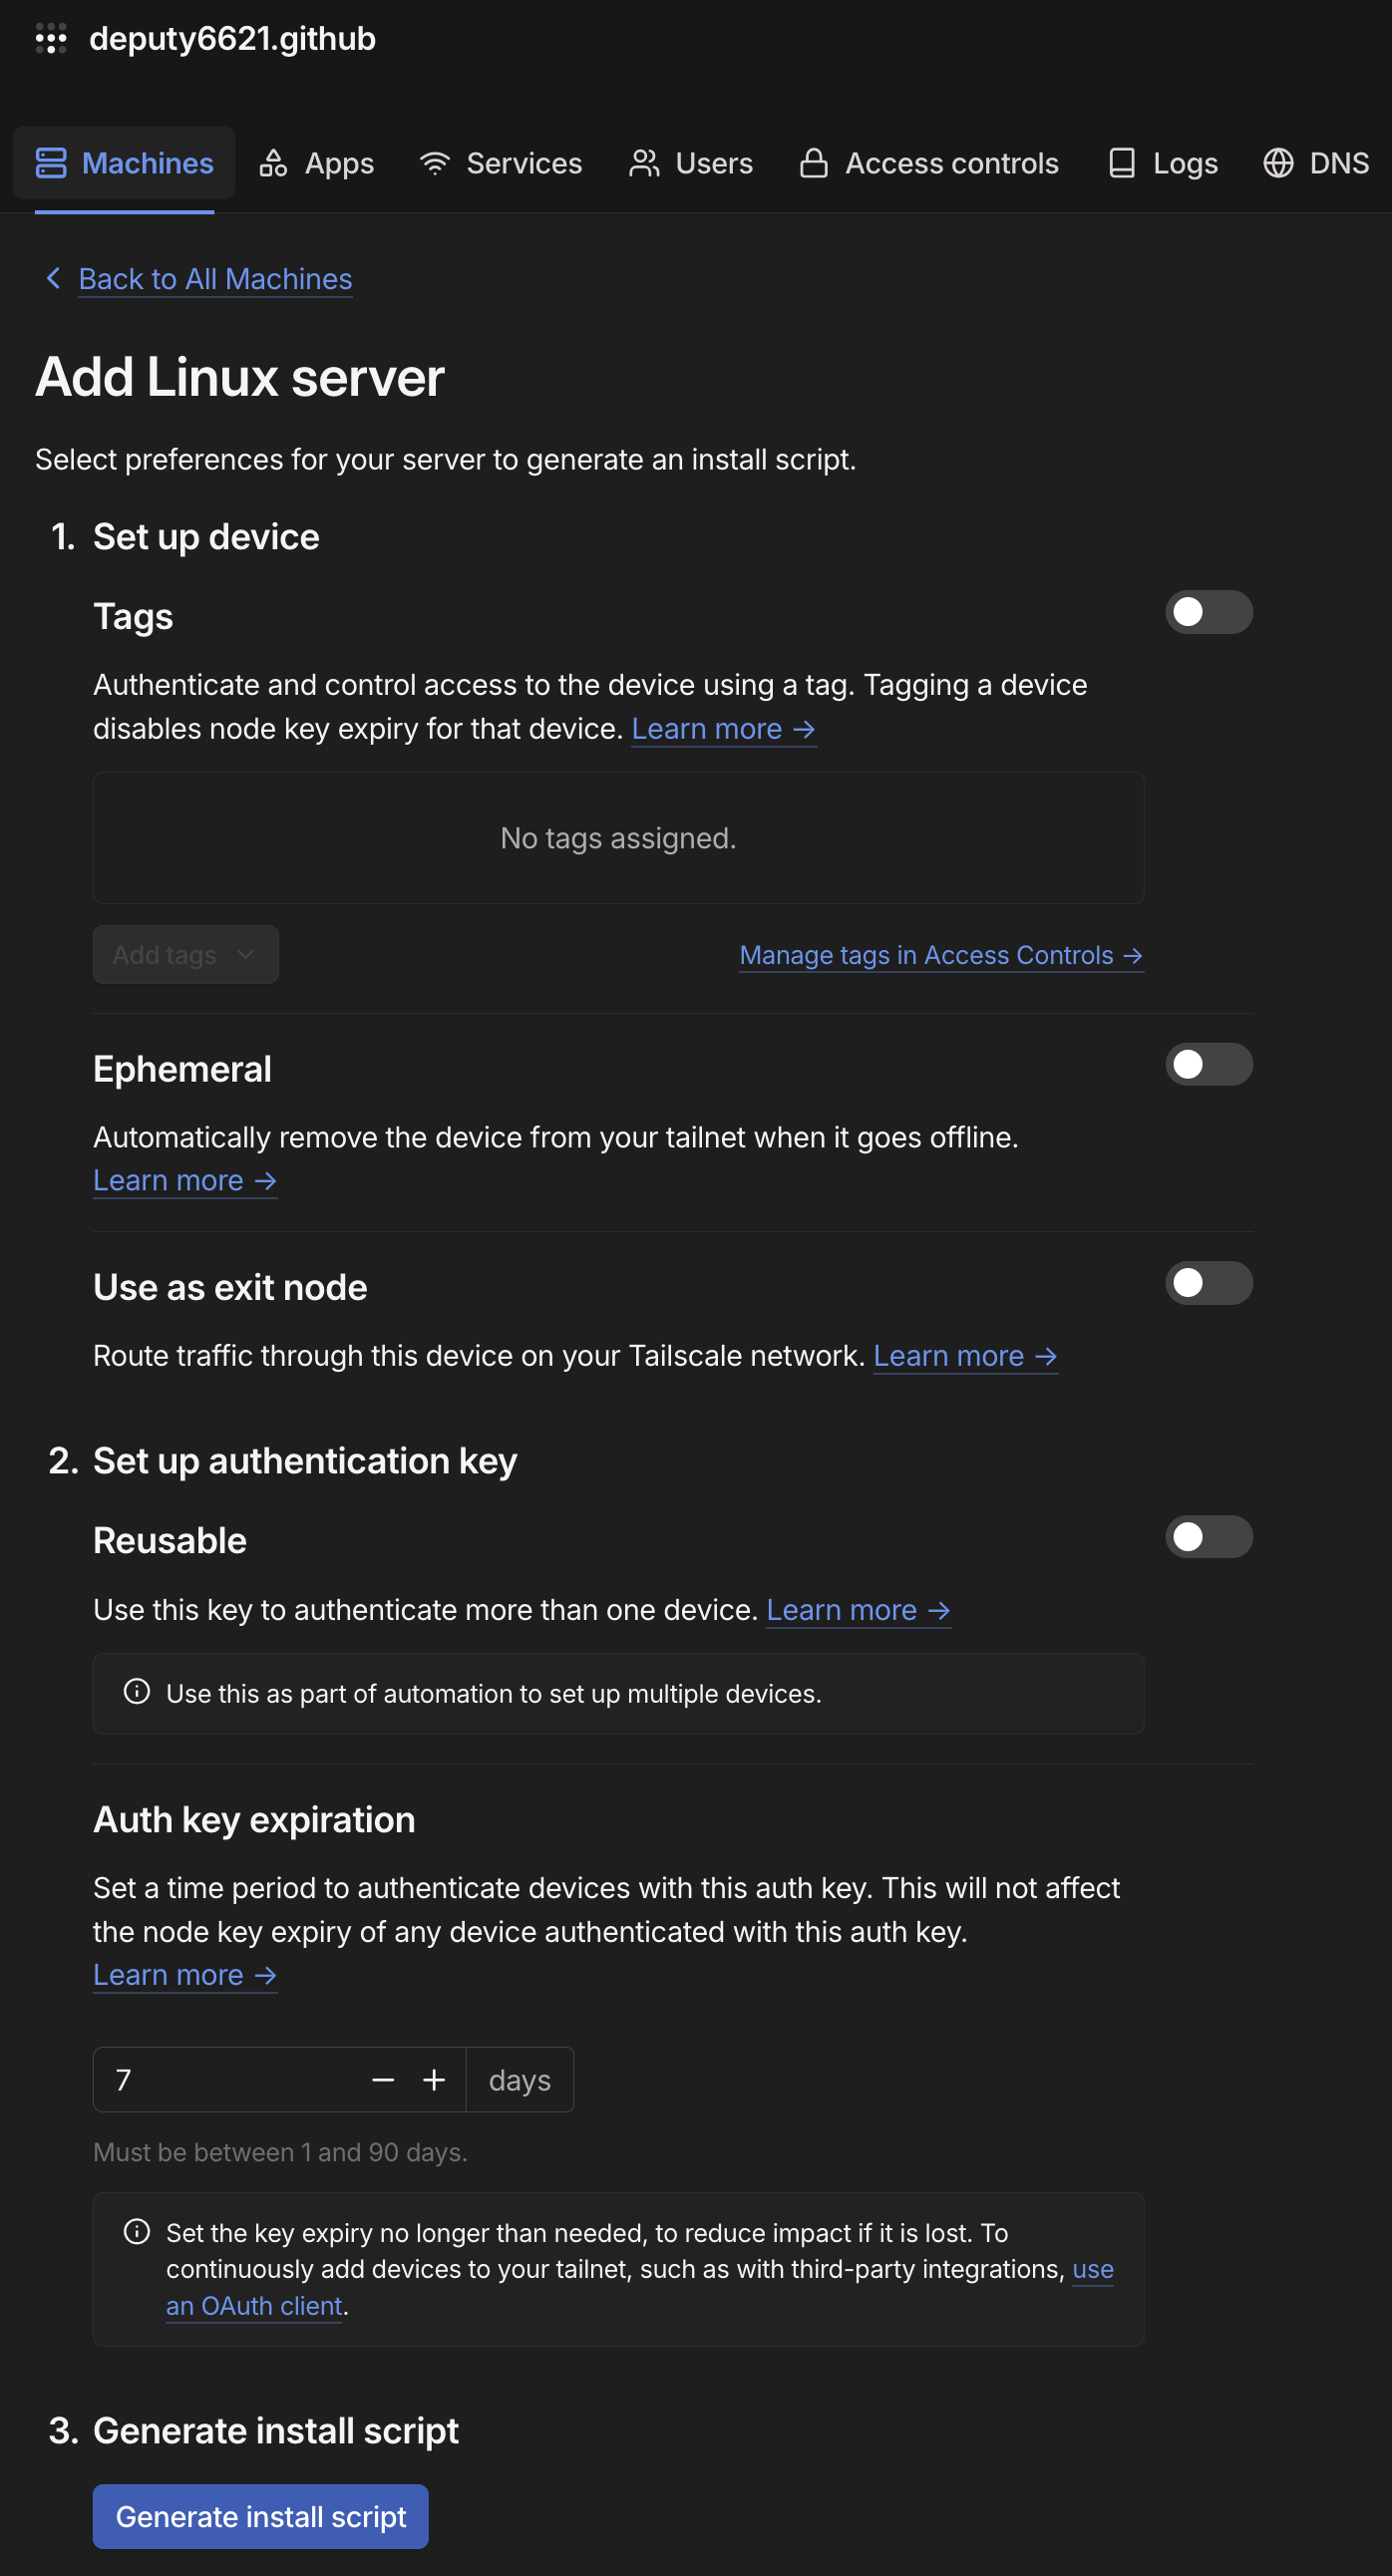
You will be taken to a page that automatically generates a script just for your Linux server to join the Tailnet. You don't need to worry about the settings you see for now, you can just click "Generate install script" at the bottom of the page:
You will be given a string of text that looks something like this:
1curl -fsSL https://tailscale.com/install.sh | sh && sudo tailscale up --auth-key=tskey-auth-kzkeq77wzA11CNTRL-LdNB6d53Z5TQ3RvVyvgm5TTrmRs9rLGh
which you should copy. Please note, however, that the reason I am so cavalier about posting this string online is because it can only be used once on account of the "Reusable" option not being set (and the fact that its expired by the time you read this article). I have already used it, and if you attempt to use it, it will be rejected. However, this key grants a device access to your Tailnet, do not give it to anyone else.
Now, you copy that string, and execute it on your server! It will install and configure Tailscale. Assuming everything worked, your machine should show up in the Machines View in the Tailscale admin panel:

Disable Key Expiry #
One last thing you're going to want to do is disable key expiry for the server. You should NOT do this for personal devices like your phone or PC, its a security feature, but you should do it for this server because the whole point is for this to be as hands-off as possible.
The way to do that is to find the server in the Machines View of the Tailscale admin panel, click on the "meatball menu" to the right of the name (the three dots arranged horizontally), and then click "Disable Key Expiry".
If you did it correctly, a little "Expiry disabled" tag should appear right below the machine name.
Domain Setup #
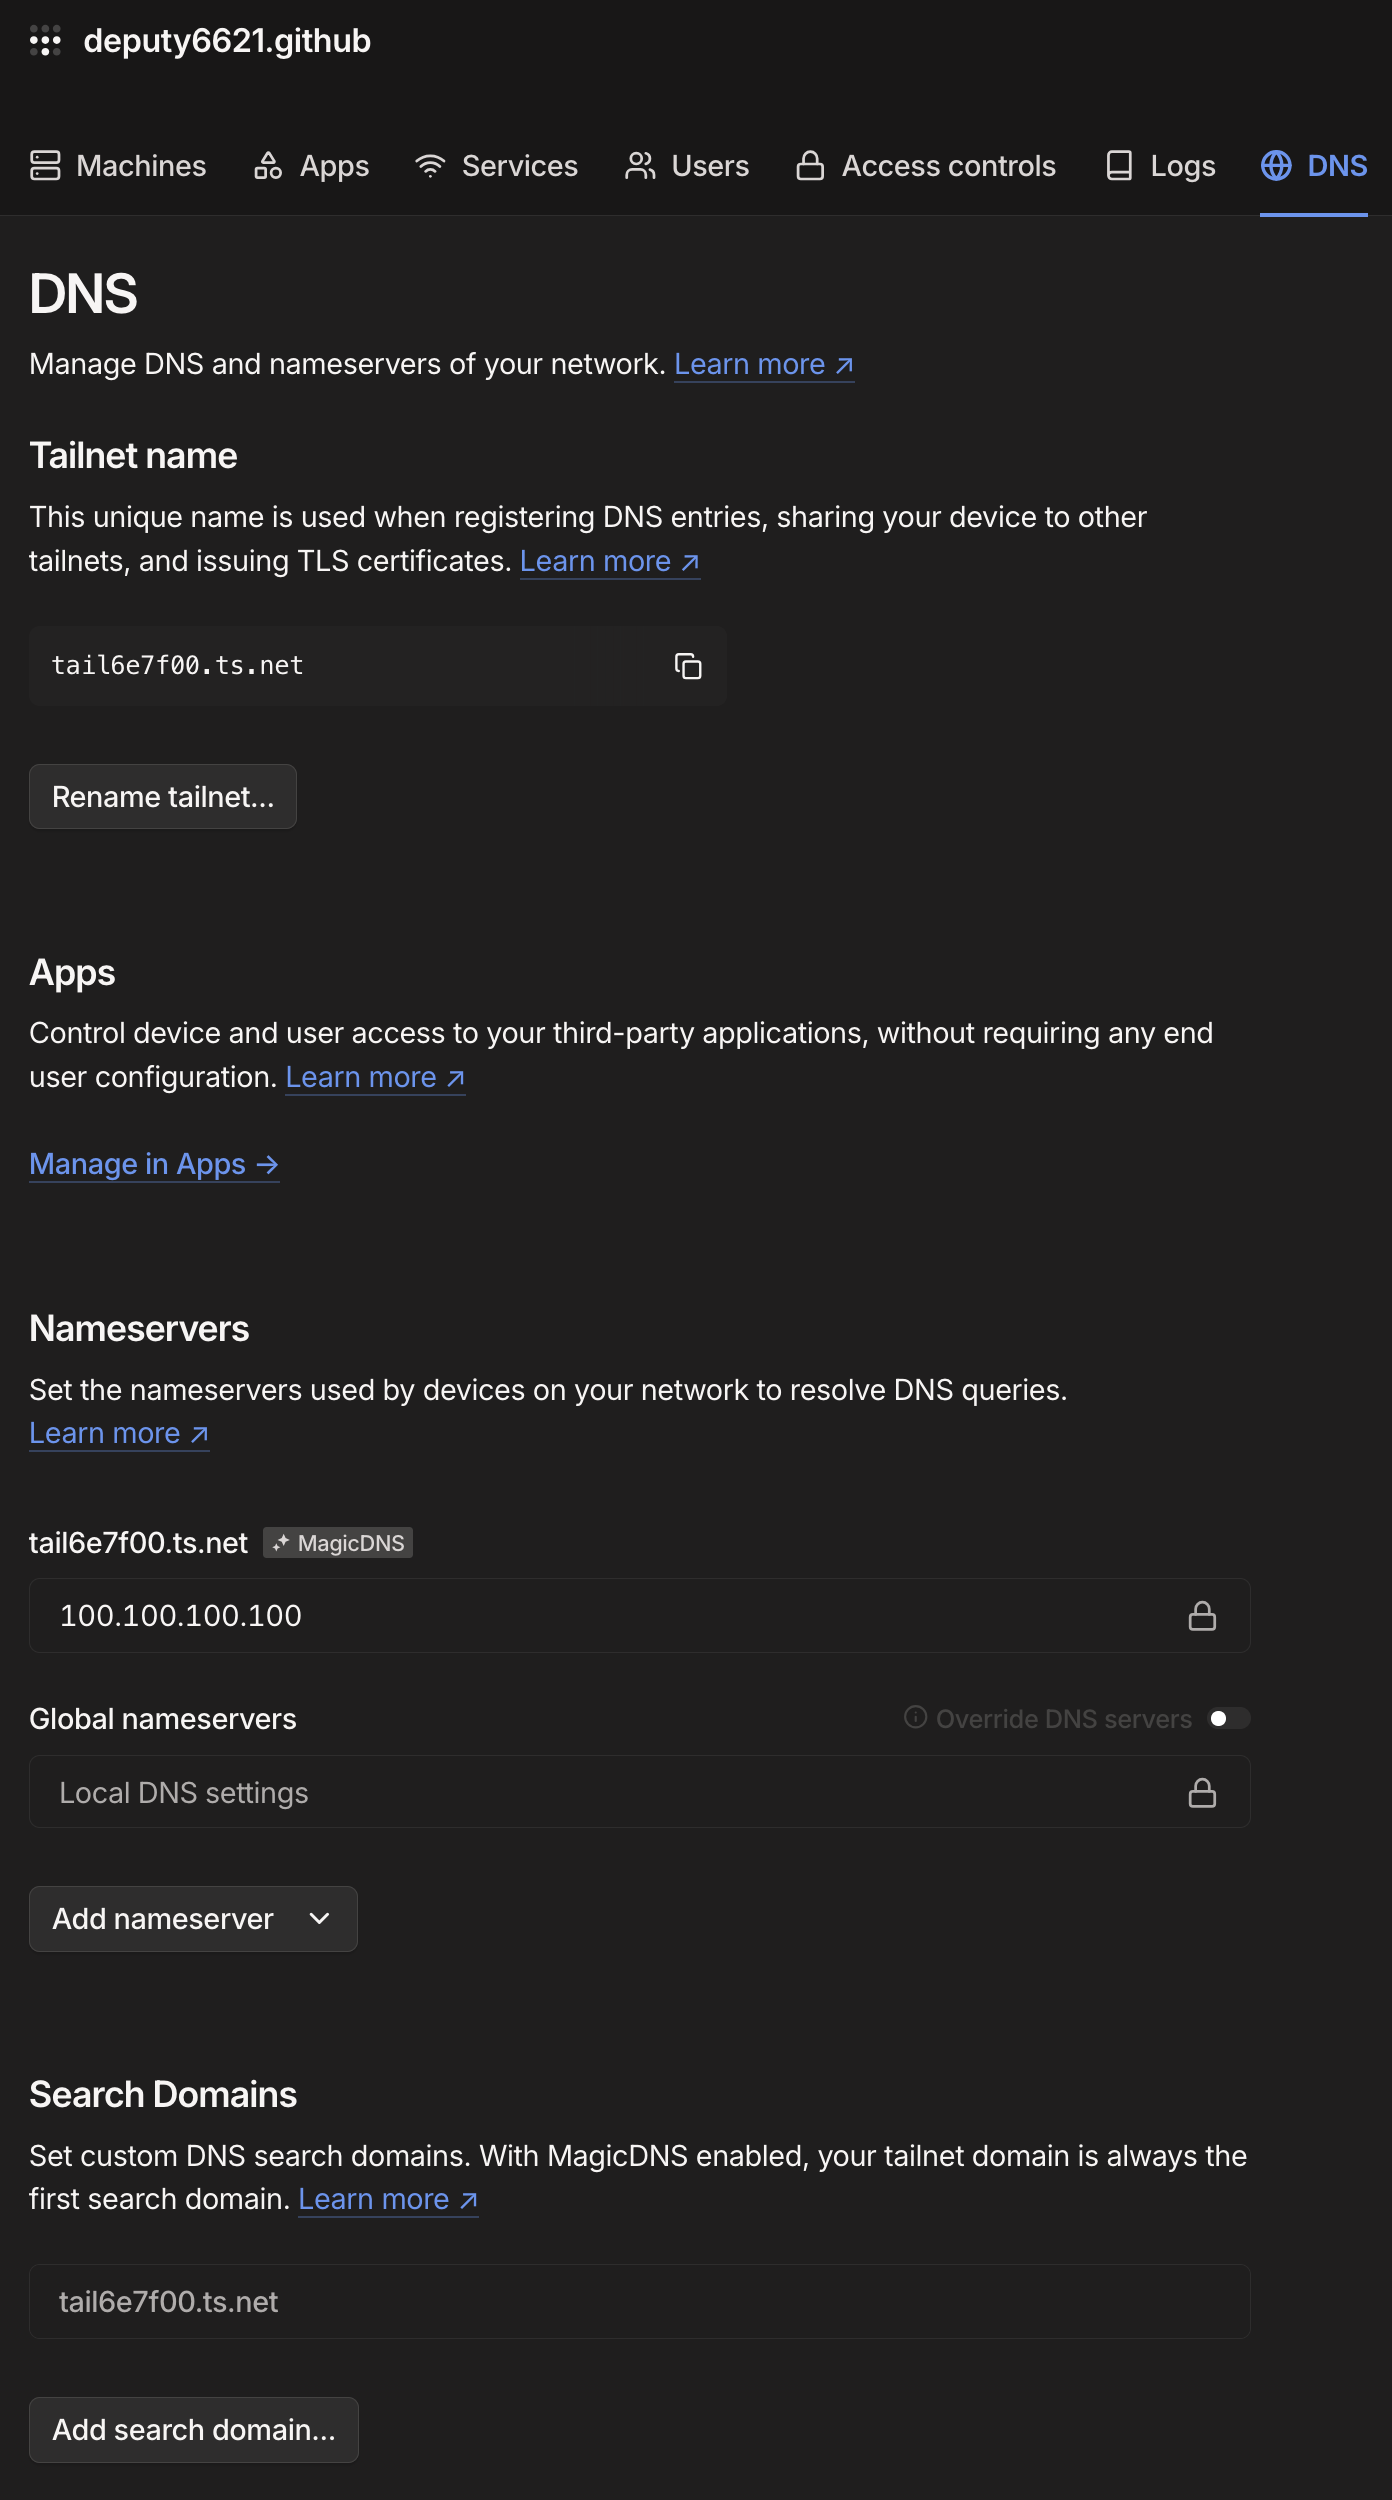
The next thing you're going to want to do is configure your Tailnet domain. For this, go to the DNS tab in your Tailscale Admin Panel and you should see something like this:
Note that you will have a randomly assigned Tailnet domain already, and if it works for you, that's great, however, you may want something easier to remember and now is the best time to handle that before changing your domain name screws everything up.
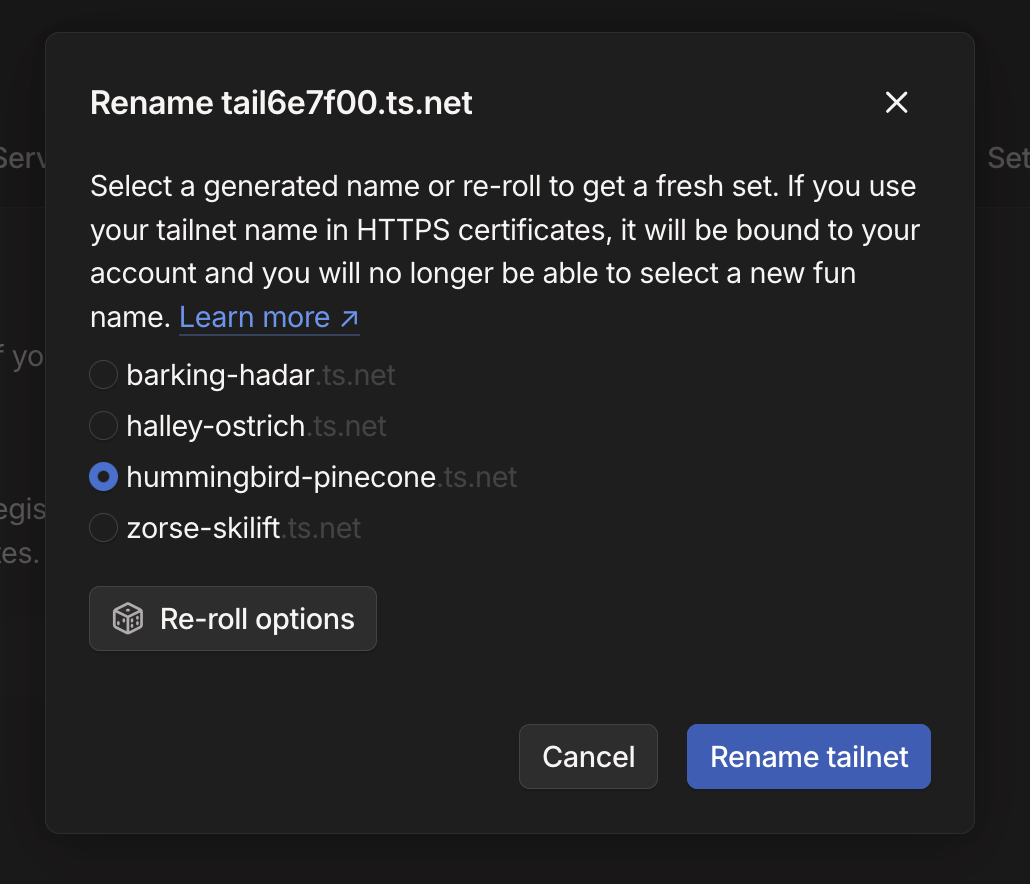
Click the "Rename Tailnet" button, and you will be given several options for a randomly generated Tailnet domain. If you don't like any of the options, feel free to re-roll. I ended up picking hummingbird-pinecone.ts.net, so whenever you see that domain in this blog post series, be sure to substitute your own domain name.
Aside from this, everything should basically be correct, but just make sure that MagicDNS is enabled and the default DNS server is set to 100.100.100.100 for all your devices.
Optional: Ad-Blocking DNS #
One of the "killer apps" of self-hosting is the ability to use something like a Pi-hole to block ads network-wide. If you're reading this article, you may even be familiar with it. Its a network-wide DNS-based ad-blocker which stops ads, tracking, and malware by simply null-routing all domains that are on its blocklist.
Pi-holes are absolutely wonderful, but they have a key disadvantage: They typically work on your local network and it is not simple to make them securely available to yourself when you're not at home. Luckily, Tailscale and Mullvad have our back.
We can look through the Mullvad DNS server page, and determine that they have several DNS servers that block different things, namely:

If we want to block ads, trackers, and malware, we should mostly be interested in the "base" DNS server which has IP address: 194.242.2.4, and we can use the ad-block only (without malware blocking) as a fallback at 194.242.2.3 in case something is wrong with the main server.
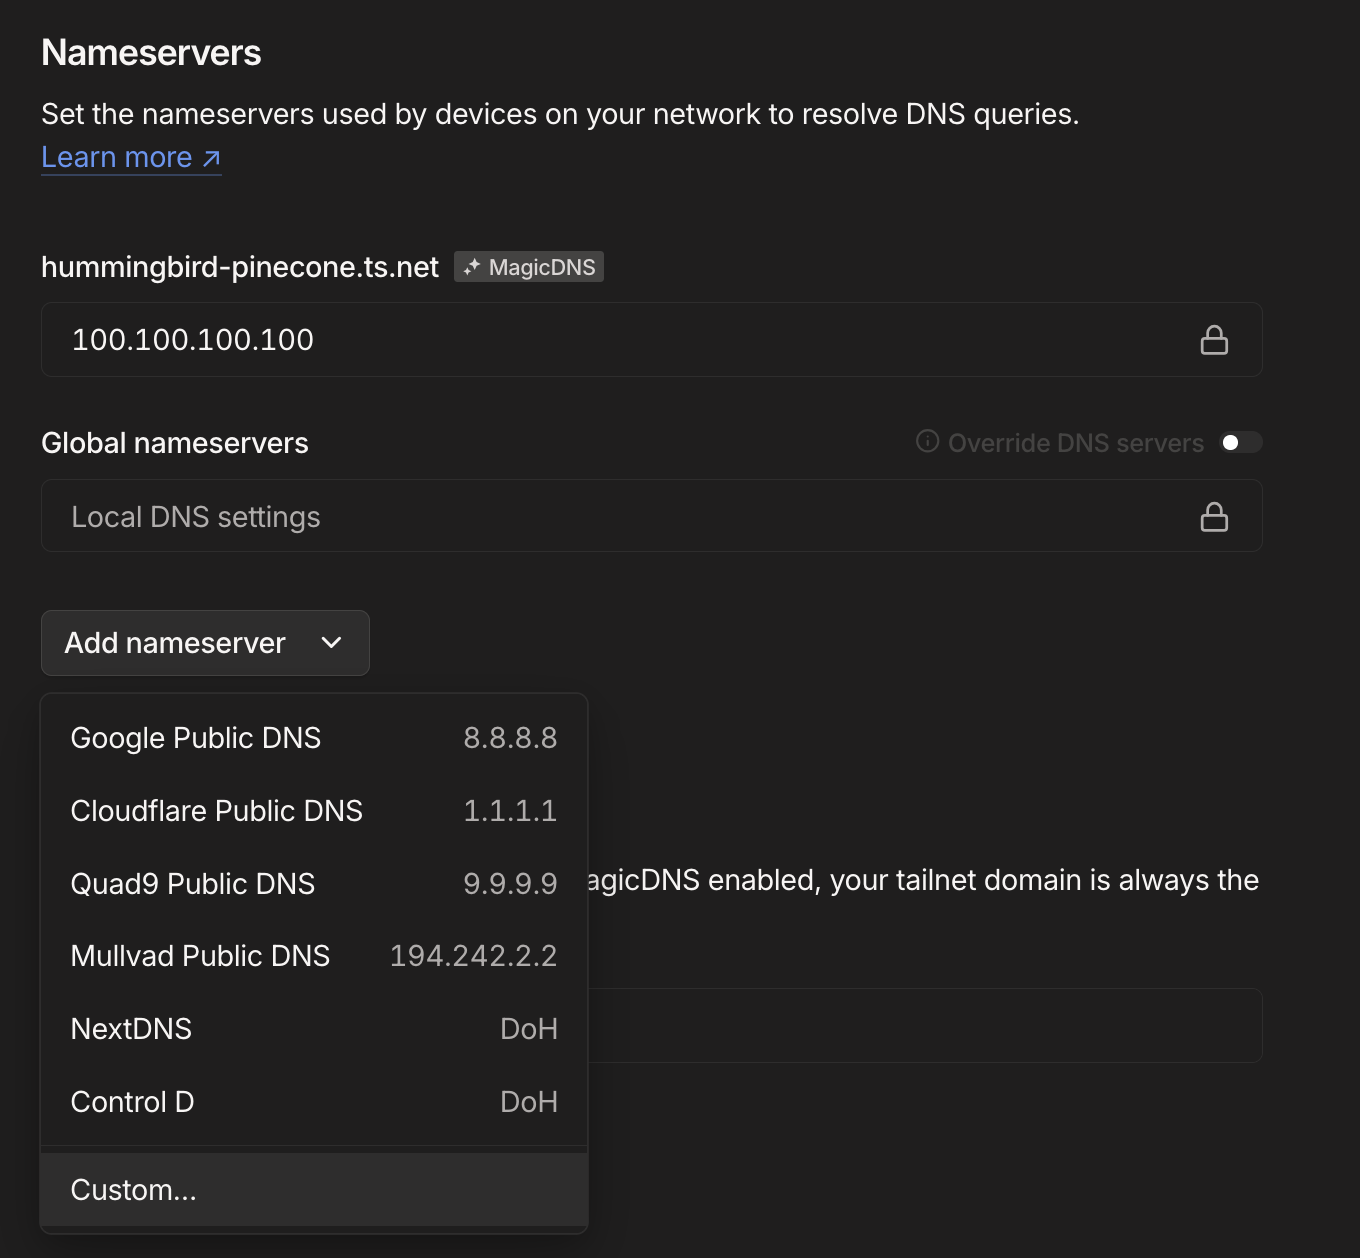
We can make this the default for all the devices on our Tailnet by going back to the aforementioned DNS page in the Tailscale admin panel, going down to the "Nameservers" section, selecting "Add nameserver", and then clicking "Custom..."
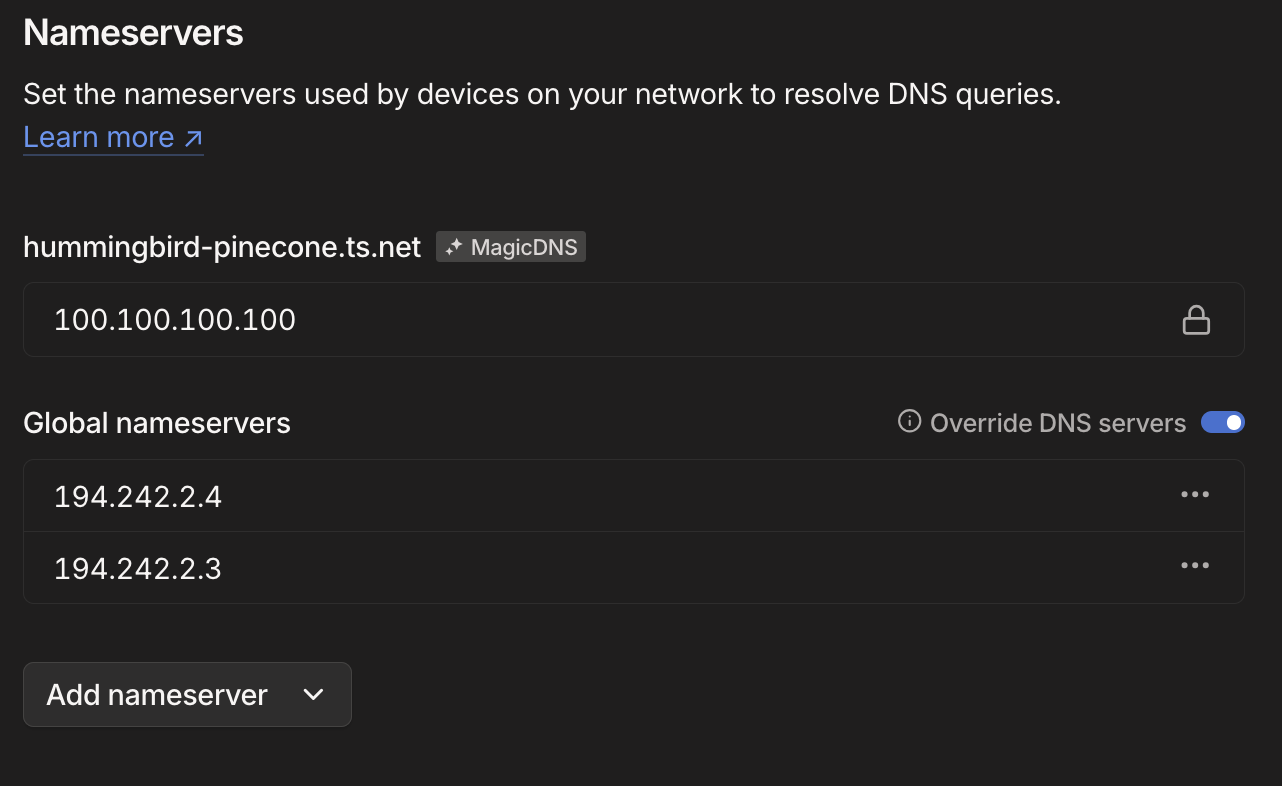
We want to add two servers: 194.242.2.4 and 194.242.2.3 in that order, and once we do that, we want to click the "Override DNS servers" checkbox so that the Nameservers section of the DNS admin page looks like this:
What does this do for us? It gives us a reasonable level of protection from ads, malware, and trackers by default (if they're DNS-based, which not all are) on any devices connected to our Tailnet, and in case something is wrong with that DNS server, the other one (which only protects against ads and tracker) will pick up the slack.
SSH Access #
OK, so we have the machines configured to be on the tailnet, we have a domain, and that's lovely, but we want to SSH from one to the other so that we can stop remembering the IP address and so on.
Well, that's basically already been taken care of for you in the previous section on Domains. There's only one thing you need to do, which is allow SSH on the Linux server by executing: tailscale up --ssh which basically tells the server to accept SSH connections via Tailscale. Assuming everything worked correctly, you should see the "SSH" tag next to the name of the server in the Machines View of the Tailscale admin panel:

Now all you have to do to SSH from one machine to another regardless of where they are relative to each other with just ssh <tailnet-machine-name>. For example, remember how I mentioned that my personal mac on this Tailnet was named # cyclics-mac-mini? Well, now I can SSH into it from my server by typing in ssh cyclics-mac-mini (if I allowed SSH on it), and of course from the Mac Mini into the server with ssh hands-off (with hands-off being the name of the machine I am using in this article series).
Optional: Mullvad Integration #
One question that may pop into your head once you start setting up Tailscale is: "If I use Tailscale as my VPN, but it doesn't anonymize traffic like other VPN services, then what should I do for anomimyzation? Do I just switch back and forth between Tailscale and other VPNs?" And you would be right to ask this, after all, constantly switching depending on what you're doing is not only inconvenient, that inconvenience is a serious security problem as traffic may leak in a non-anonymized fashion when you're using or switching to Tailscale.
However, Tailscale has a solution to this: You can use Mullvad VPN's exit nodes.
More specifically, what "VPN services" (in the colloquial definition of "VPN") such as Proton and Mullvad do, is a small subset of VPN functionality - namely they provide what are called "exit nodes" though which all your traffic exits the VPN to the wider internet. By providing a relatively small number of exit nodes for a large number of users, they anonymize the traffic since it all appears to be coming from a single IP address, creating a lot of noise and making a single user hard to track3.
Tailscale has partnered with Mullvad VPN to provide these exit nodes integrated into their service. This way, you can cause Tailscale and Mullvad at the same time, without having to switch back and forth, allowing you to set Tailscale as your "always on VPN" (in Android Parlance).
This is not free, however, you will have to pay for Mullvad, something like €5/mo and this weakens some of Mullvad's anonymity guarantees around payments by making your identity known to Tailscale.
You can enable Mullvad integration from: https://login.tailscale.com/admin/settings/general where it says "Mullvad VPN (Paid Add-on)" - find that and click "Configure" to follow the prompt.
Optional: Taildrop #
That was a lot of complicated technical stuff above, so I wanna to finish up with a really nice feature that is just gonna make your life a lot easier. Have you ever wanted to just send a file from one device to another?
![]()
With Tailscale, you don't need to set up a complicated server, you don't need special SSH access, you don't need a dropbox. You can just use Taildrop. It is so easy, and best of all, it works from any device on your Tailnet. So now, without much issue, you can just share a file from your iPhone to your server, or vice versa.
I have to be honest, using Taildrop with a personal device is so easy that I am just not going to bother explaining it. You can see it in a GIF in the Tailscale documentation. However, I will show off how to send a file from your server to your personal device assuming that both are connected to your Tailnet.
First off, you're going to want to know the state of your Tailnet with tailscale status:
root@hands-off:~# tailscale status
100.78.65.112   hands-off            Deputy6621@  linux   -
100.103.16.128  cyclics-mac-mini     Deputy6621@  macOS   -
Let's assume that we want to send a file (let's say ~/.bash_history) from hands-off which the machine we're currently on, to cyclics-mac-mini. All we have to do is:
1tailscale file cp ~/.bash_history cyclics-mac-mini:
And as soon as we execute it, it shows up on my Mac:
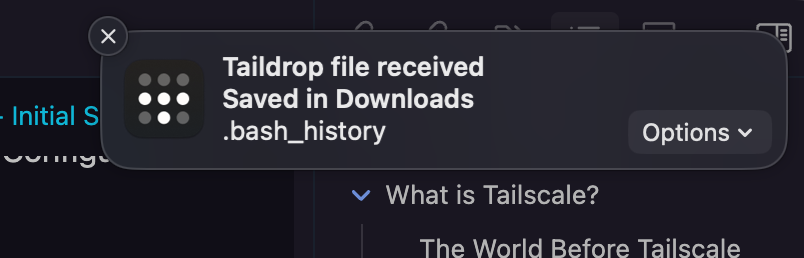
One thing to note here is that Taildrop will automatically just deposit the file into the Downloads directory on any GUI devices such as a Mac, however, in a CLI situation, if a file is sent, it would have to be retrieved with the tailscale file get command.
Conclusion #
So what have we done so far?
- We've understood the role that Tailscale plays in our homelab and how it allows everything to connect together much more smoothly.
- We've created a Tailscale account and our first Tailnet which we populated by setting up Tailscale on our personal computer as well as the server we are working on.
- We then moved on to understanding how we handle SSH access within our Tailnet as well as fun stuff like Mullvad Integration and Taildrop.
Next, we are going to understand what
dockerContainers (optional) are, and set us up to manage them effectively usingdockge.
-
What's a VPN? A lot of us are used to thinking of a VPN as a tool for anonymizing our traffic online, like Proton or Mullvad, and it can definitely be used this way, but it can do a LOT of other things as well. A VPN is literally a virtual private network, much like a virtual machine, using a VPN has advantages in that it can give us the network topology we care about which does not care about the limitations of the actual, physical network topology. Put another way, one of the things it can do, is allow us to connect all our devices in a single network as though they're on a LAN connected to the same router, no matter where they are on the network. ↩︎
-
One thing I absolutely love about the Tailscale client is that its easy to add multiple accounts and connect to multiple Tailnets, so despite setting up a dedicated account for this blog series, I am still able to easily switch back and forth as needed and not disrupt my "main" personal setup. ↩︎
-
Note that "hard to track" is not the same thing as "virtually impossible to track", and VPNs not only have occasional vulnerabilities, but require that the VPN operator themselves be trusted not to reveal the identities of their users. ↩︎