Table of Contents
By this point, you should have a server set up, and the server should be connected to a Tailscale mesh-VPN which helps us to simplify most of connectivity tasks associated with operating a homelab. Now we want to use this great power to actually run self-hosted web applications in docker containers. It is worth noting that this article expects you to understand what docker containers are and the associated terminology around them. If you don't know that, please refer to one of the "Optional" articles in this series called "Reasoning About Docker".
In this section, we're going to set up a new tool, actually our first Docker compose stack, called dockge which we will then use to manage all of our docker containers, and we are going to make it accessible through our Tailnet which we configured earlier.
By this point you should be recognizing that these articles are all meant to be consumed in series and build on top of each other.
What is Dockge? #
References:
First off, what in the world is dockge? - it's a web application that allows you to manage docker stacks and containers through a simple web interface. There are many other systems that do the same thing - most notably, Portainer - however, I've found, in my experience, that those systems are not only way more complicated than we want (which is bad) but they are also enshittified, putting key features like container shell access behind a paywall.
Dockge's simplicity is its #1 advantage without a doubt. Here is a complete list of things you can do with it:
- Set up a new docker stack.
- Edit the compose file for said docker stack.
- Edit the environment variables associated with the stack.
- Run the stack.
- Stop the stack.
- Delete the stack.
- Update the stack.
- Access the bash shell of a running container (or
shifbashis not available). - View the logs of a stack.
- See that all the stacks are running.
- It be free.
That's it, and I have to be honest, I think that's all you need.
Setup #
Docker Installation #
References:
First we need to install docker, which is, luckily, documented very well:
 1# Add Docker's official GPG key:
 2sudo apt-get update
 3sudo apt-get install ca-certificates curl
 4sudo install -m 0755 -d /etc/apt/keyrings
 5sudo curl -fsSL https://download.docker.com/linux/ubuntu/gpg -o /etc/apt/keyrings/docker.asc
 6sudo chmod a+r /etc/apt/keyrings/docker.asc
 7
 8# Add the repository to Apt sources:
 9echo \
10  "deb [arch=$(dpkg --print-architecture) signed-by=/etc/apt/keyrings/docker.asc] https://download.docker.com/linux/ubuntu \
11  $(. /etc/os-release && echo "${UBUNTU_CODENAME:-$VERSION_CODENAME}") stable" | \
12  sudo tee /etc/apt/sources.list.d/docker.list > /dev/null
13sudo apt-get update
14sudo apt-get install docker-ce docker-ce-cli containerd.io docker-buildx-plugin docker-compose-plugin
You can then quickly test that everything is running correctly with:
1sudo docker run hello-world
Dockge Installation #
References:
- Dockge Website Then we need to install Dockge, which is similarly well-documented and of course simple:
1# Create directories that store your stacks and stores Dockge's stack
2mkdir -p /opt/stacks /opt/dockge
3cd /opt/dockge
4
5# Download the compose.yaml
6curl https://raw.githubusercontent.com/louislam/dockge/master/compose.yaml --output compose.yaml
7
8# Start the server
9docker compose up -d
One thing to keep in mind is that Dockge is (by default) accessible on port 5001 and the configuration files for each stack are kept in /opt/stacks.
Making Dockge Accessible From Your Tailnet (Tailscale Serve Basics) #
Assuming you did the above correctly, Dockge should now be running on your system, which is lovely, but you want to access it in your browser, how do we do that?
This is where tailscale serve comes in. This is the other glorious feature of Tailscale that we have yet to discuss. Essentially, tailscale serve allows us to make a web app accessible on our Tailnet (and only on our Tailnet, which is what we want for the application that is going to be key for operating everything, we don't want it exposed on the internet).
To make Dockge available (assuming you installed it using the configuration above) execute the following:
1tailscale serve --bg 5001
Where 5001 is the port where Dockge is listening. When you execute this command for the first time, you may be prompted to enable serve:
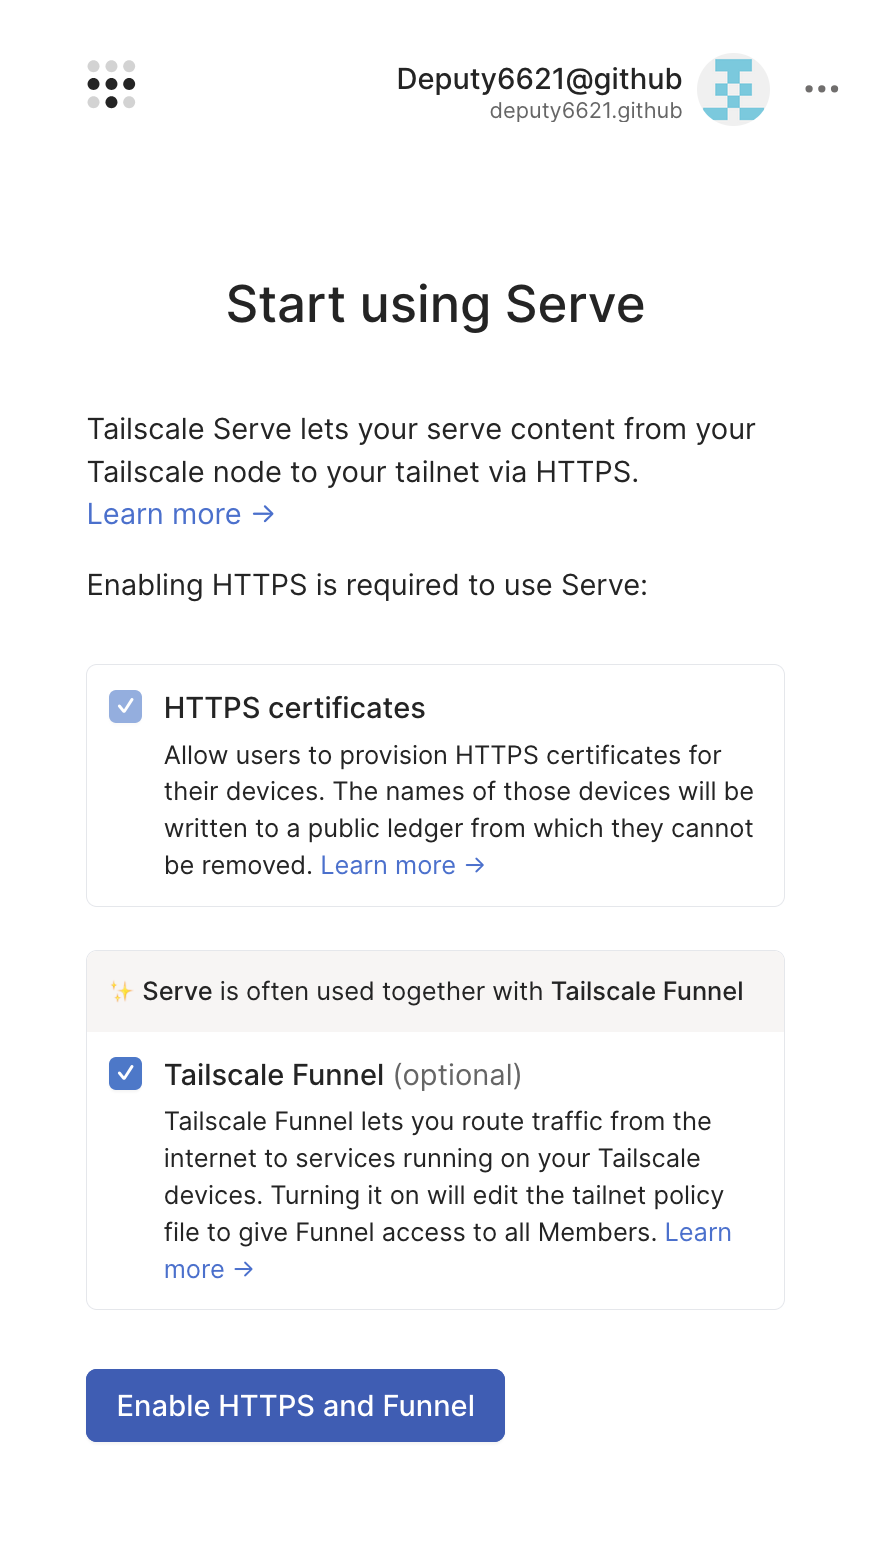
Please do so as prompted - keep in mind that at this stage we are only enabling funnel functionality on our account, but we're not using it for Dockge, we are using serve functionality, which means Dockge (a security-sensitive control application) is only accessible in our Tailnet.
Now, assuming everything worked correctly, you should be able to access Dockge at: https://<SERVER>.<TAILNET_NAME>.ts.net/ which in my case is: https://hands-off.hummingbird-pinecone.ts.net/. Please note that the first time you spin up an app it may take a while for the app to become available.
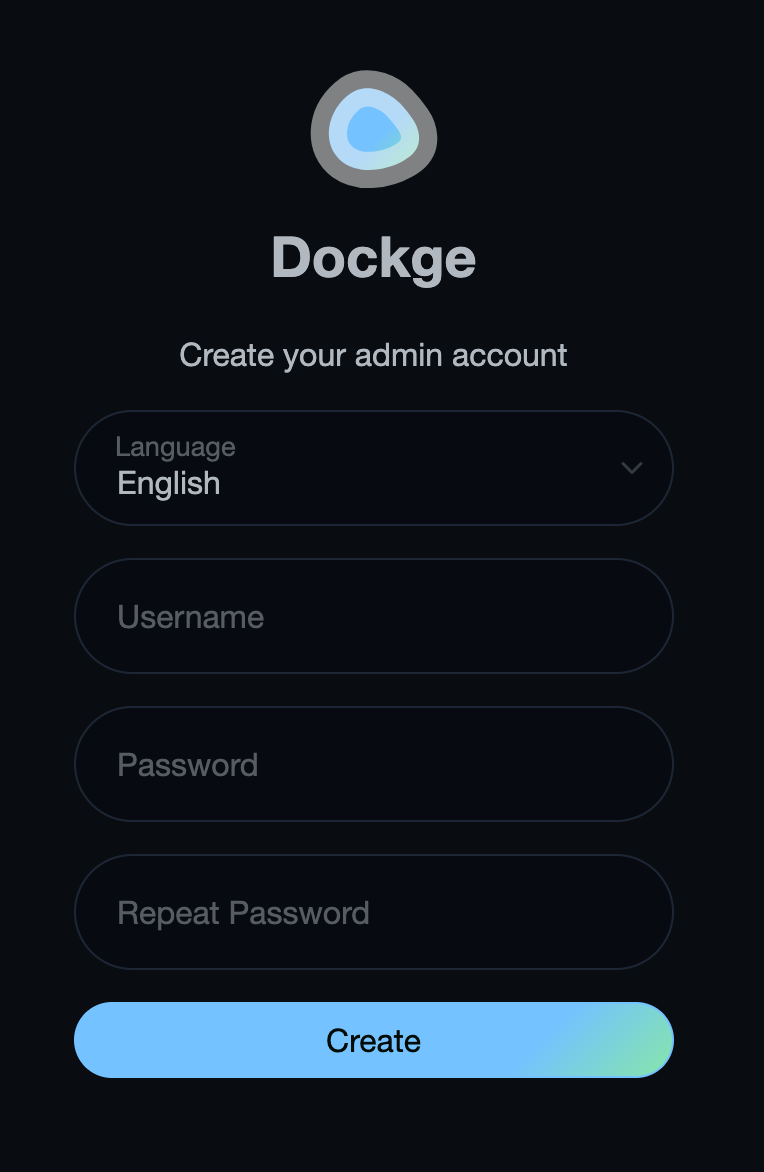
Running Dockge for the first time, you will be prompted to create an administrative account. Please be sure to use a secure, randomly generated password and store it in your password manager.
SSH Port Forwarding as a Fallback #
It is not inconceivable that in your work on your homelab you will encounter situations where things don't go according to plan, so for an application like Dockge, which is going to be central to our configuration work, you want to have a fallback plan. I recommend using SSH port forwarding.
I am not going to explain in this article series how SSH port forwarding works, but just focus on the basics. Assuming you have access to your server with ssh <SERVER> (in my case: ssh hands-off), you should be able to forward port 5001 from the server to your local machine like so:
1ssh -L 5001:127.0.0.1:5001 hands-off
And now, you should be able to access Dockge in your browser by going to http://localhost:5001. Don't worry about the lack of HTTPS, the port forward is secure with SSH. The port forward will last as long as the SSH session resulting from the command.
First Stack: Watchtower #
Great! We have Dockge configured and everything is working wonderfully, but how do we actually use this thing to make container stacks and run the applications we want to run? And what exactly makes this thing "hands off", didn't I say that Dockge has a button for updating containers? That's not very "hands off" if we have to do it manually!
This is where watchtower comes in. Watchtower is a docker container that concerns itself with updating other docker containers running on the same system. It is going to handle the "hands off" aspect of all this, and of course its going to be the first (well actually second, after Dockge) stack that we configure.
To create the stack, we're going to go to the Dockge interface and click "+ Compose" in the top left, at which point we will be presented with something like this:
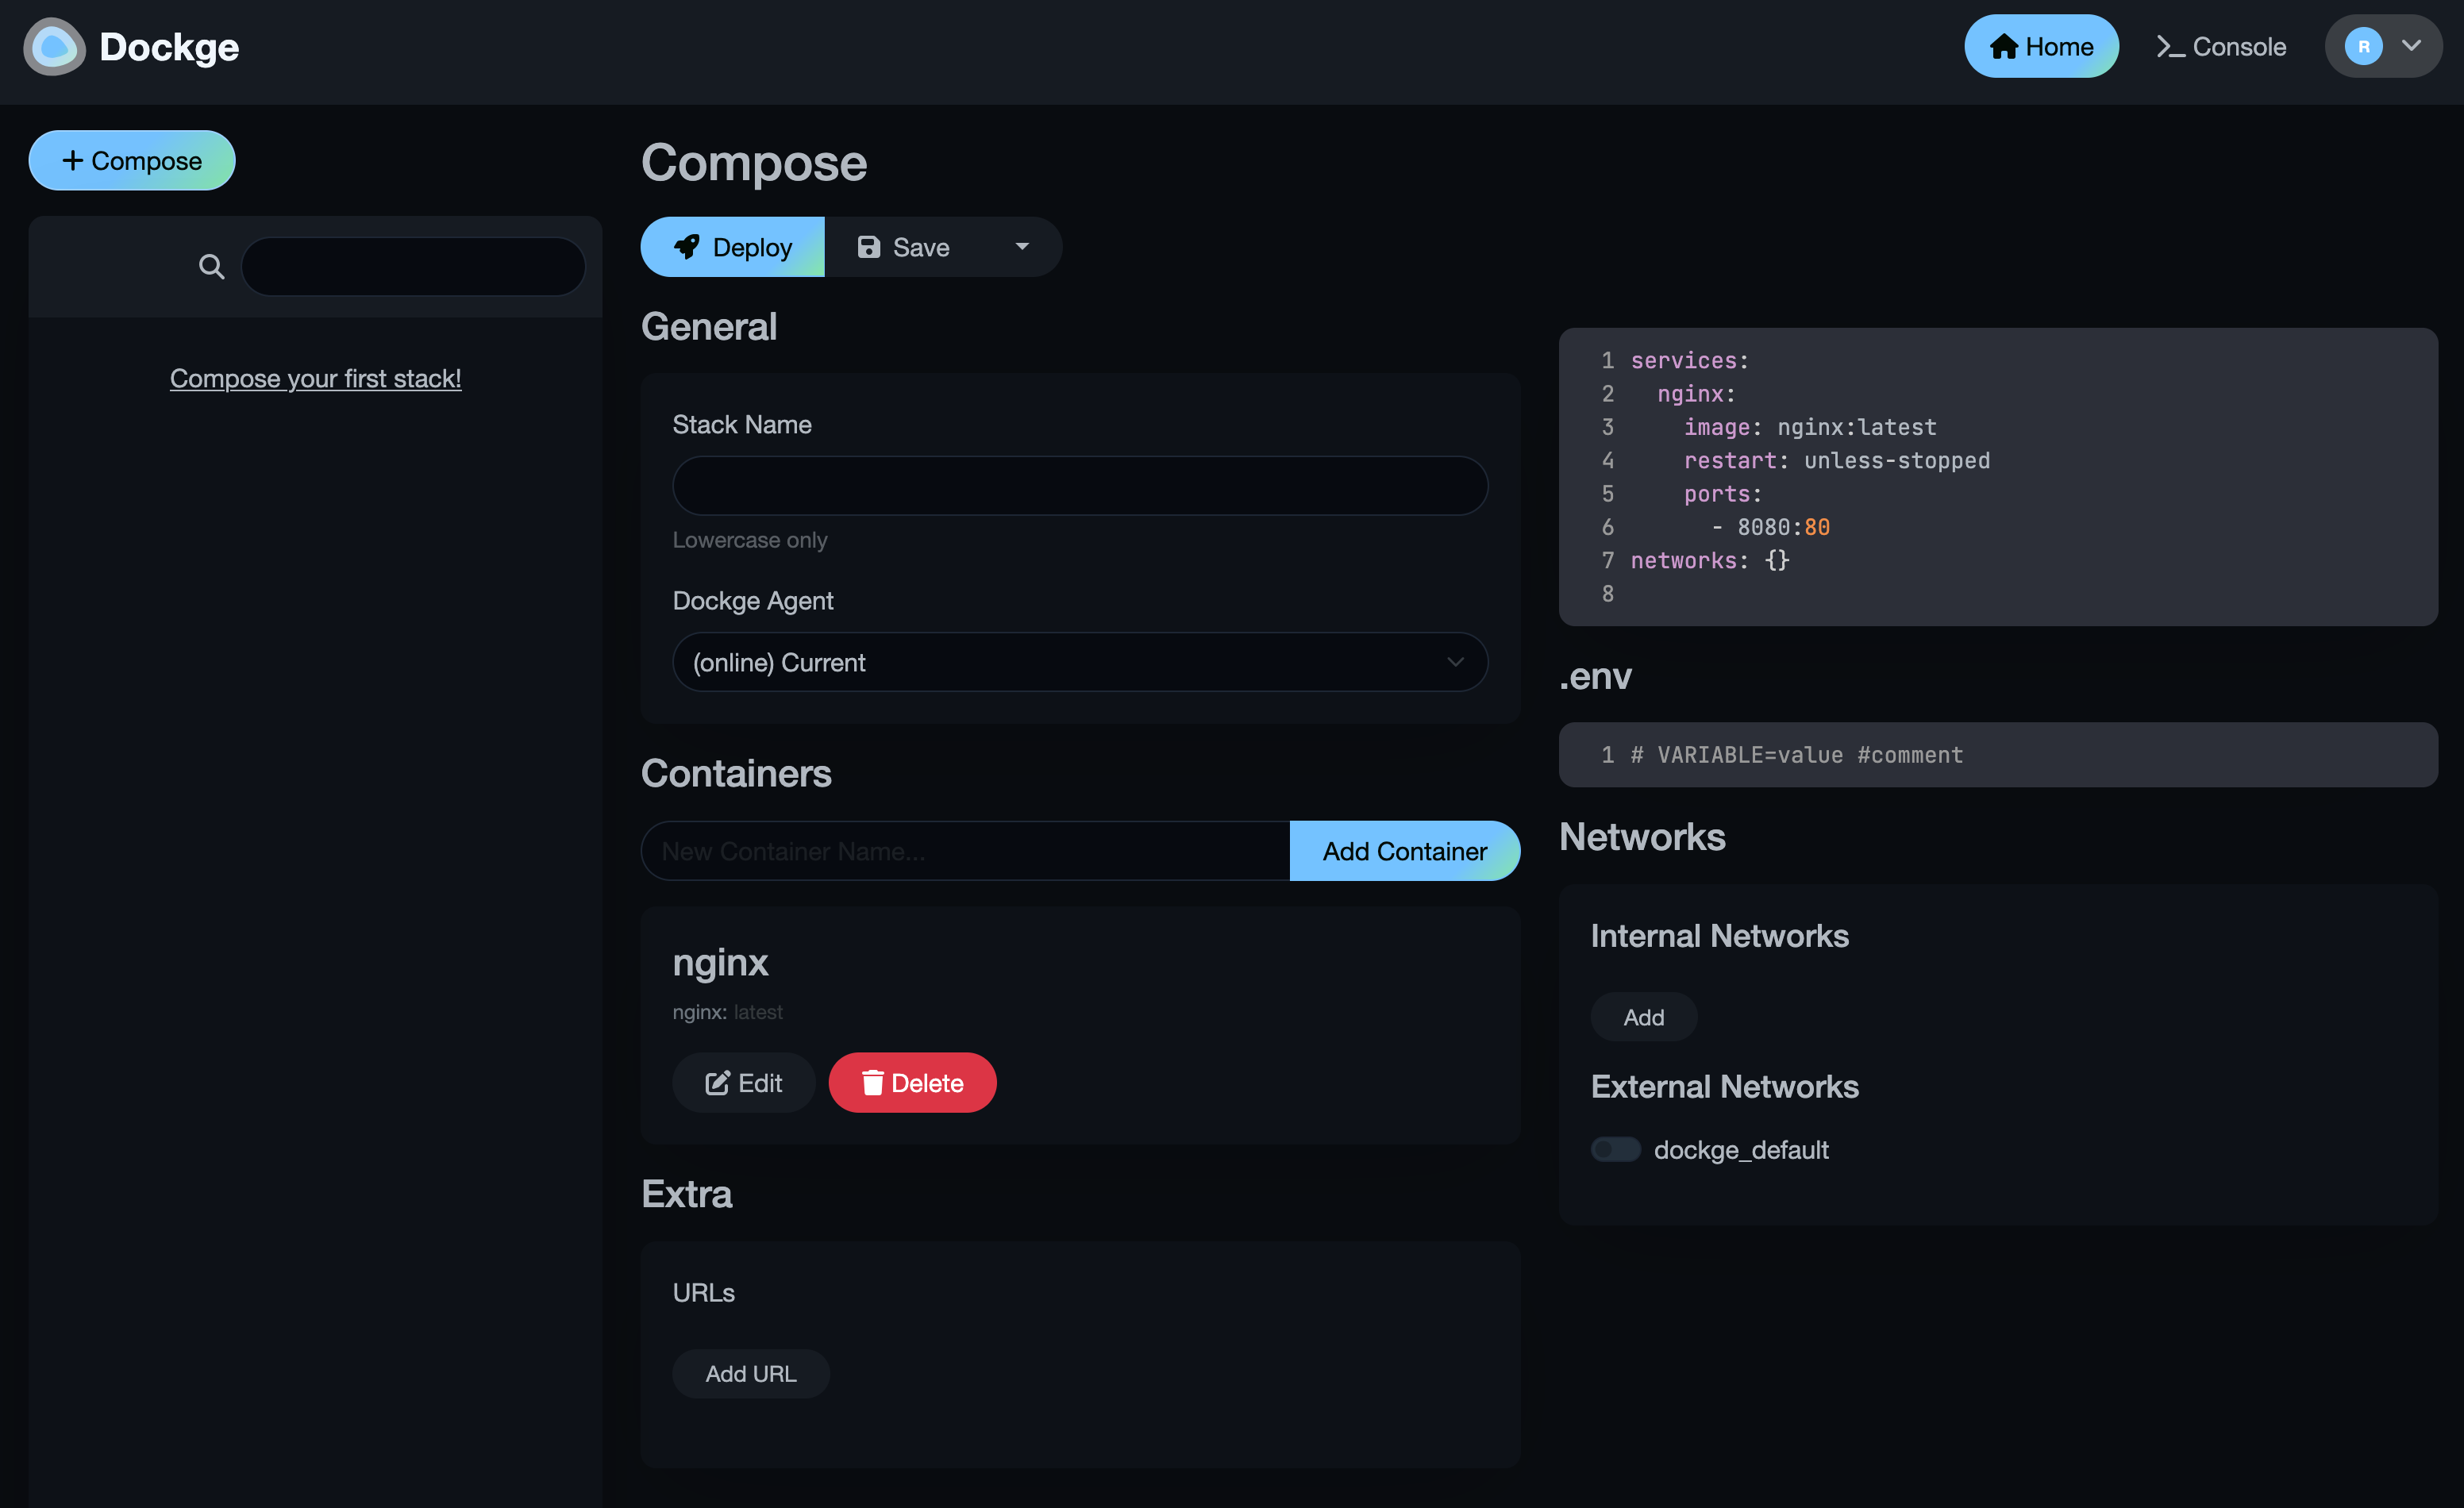
All we really care about the is Stack Name, and the configuration on the right. Everything else will actually be reading/writing to that configuration.
Set the name to watchtower, and paste the following into the compose configuration:
1services:
2  watchtower:
3    image: containrrr/watchtower:latest
4    restart: unless-stopped
5    volumes:
6      - /var/run/docker.sock:/var/run/docker.sock
7
8networks: {}
and then you can hit deploy... and then that's basically it. You're going to see some cool scrolling text, and if everything worked, you should see in the log output something to the tune of:
watchtower-1  | time="2025-06-10T01:36:46Z" level=info msg="Checking all containers (except explicitly disabled with label)"
watchtower-1  | time="2025-06-10T01:36:46Z" level=info msg="Scheduling first run: 2025-06-11 01:36:46 +0000 UTC"
watchtower-1  | time="2025-06-10T01:36:46Z" level=info msg="Note that the first check will be performed in 23 hours, 59 minutes, 59 seconds"
and after that its just gonna update your containers every day and you don't have to think about watchtower anymore.
Conclusion #
In this article, our biggest accomplishment was putting the basics of what we know about docker containers into practice with dockge. Next, we're going to host our first "useful" thing: microbin.