Table of Contents
We are well on our way to having a fully-functional self-hosted, hands-off system for our homelab in which we can basically host anything. In previous sections we covered things like Tailscale, Docker, and Dockge which are going to enable our glorious setup. But now, we get to actually host something!
In this article, we are going to concern ourselves with hosting a fairly basic application called MicroBin, which is a simple Pastebin service for sending files to people. It will be configured to run through Dockge, so make sure you're familiar with that setup, however, there will be something new here: MicroBin will be available to the whole world to use, not merely stuck inside your Tailnet!
MicroBin (Basic) #
I am not going to spend a lot of time explaining what MicroBin does, I don't really even care if you want to host it or not. Its primary purpose in our situation is to provide an application that is simple to deploy. You can read about it here: https://microbin.eu/ (source code and more details are available here: https://github.com/szabodanika/microbin) and you can try it out here: https://pub.microbin.eu/
Tailscale Serve vs Tailscale Funnel #
Previously, when working with Dockge, we had some experience with tailscale serve which is making Dockge available to us on our Tailnet when we put in the hostname of our server into our browser. However, this comes with two key disadvantages:
tailscale servecan only proxy one application at a time. This is kind of a mood killer - we thought we had the pattern down, but if we can't serve other applications to likemicrobin.<SERVER>.<TAILNET_NAME>.ts.netthen what's the point?1tailscale serveonly makes things available on our Tailnet, but that's not very interesting for MicroBin as we want to send files to anyone, anytime, anywhere. So how are we going to overcome this? Entertailscale funnel. There's really nothing to say about it... its the same thing astailscale servebut it works for proxying stuff with HTTPS to the whole internet instead of only to your tailnet.
Tailscale as a Container #
But the above only overcomes the second problem... what about the first one? Well, what if I told you that we can simply run Tailscale as a container in the same stack as our MicroBin container. All we have to do is give it the right key to authenticate to Tailscale and we're basically off to the races.
References:
Tags & Permissions Setup #
Before we get to the fun stuff, there is a little bit of paperwork we have to do with Tailscale.
tag:container #
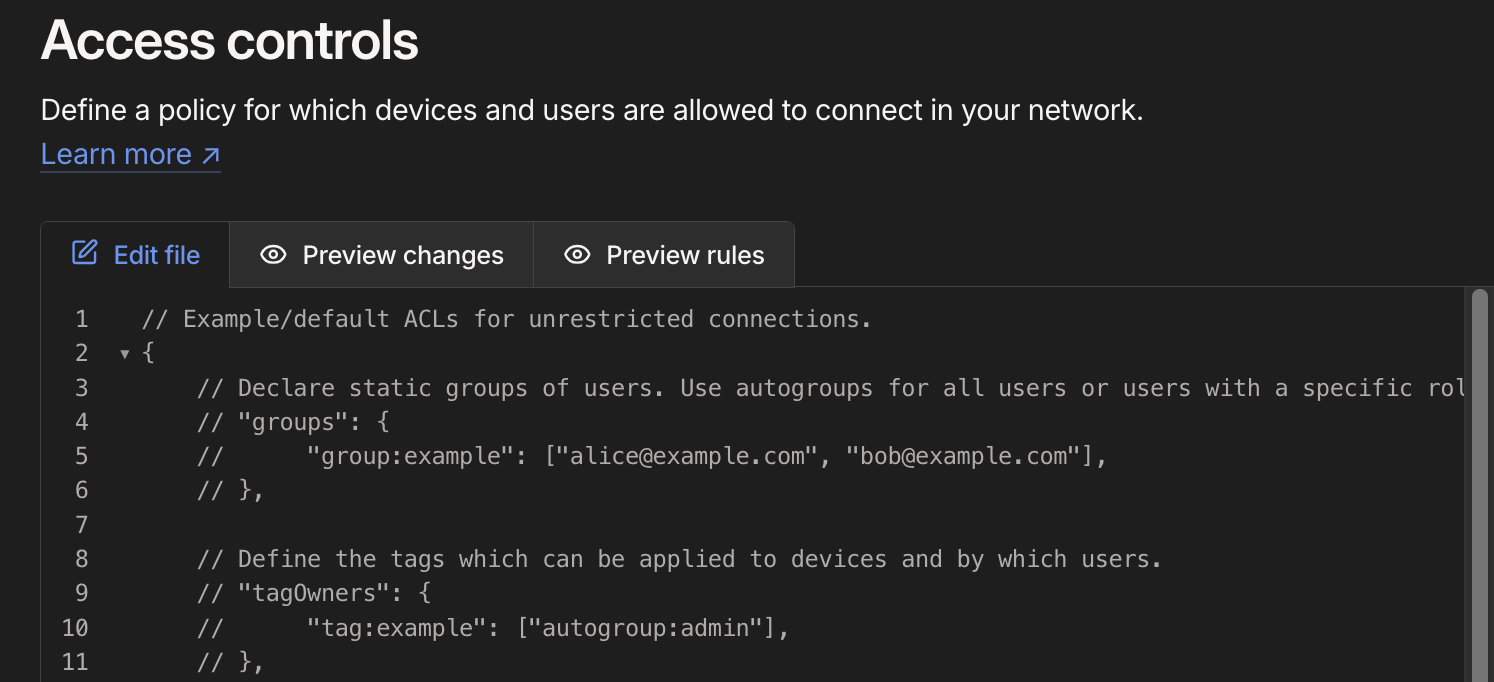
Firstly, we have to create the container tag, by going to https://login.tailscale.com/admin/acls/file and editing the file presented to us. At the top of the file, find the field marked tagOwners and uncomment it by removing the // at the start of each line. Before you do this it should look like this:
and afterwards it should look like this:
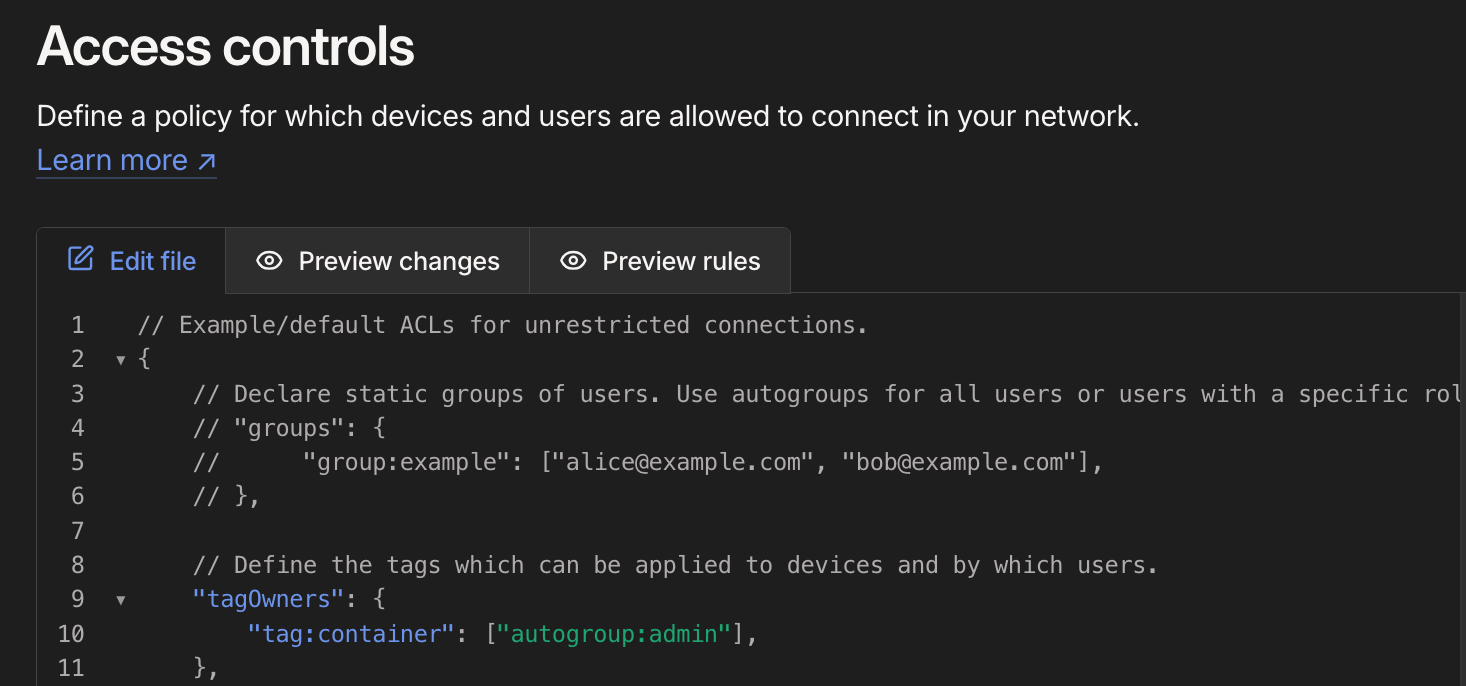
Note that besides uncommenting those lines, I also changed tag:example to tag:container. Don't worry about why this was done for now, it will make sense soon. Just don't forget to hit the "Save" button.
Key Management #
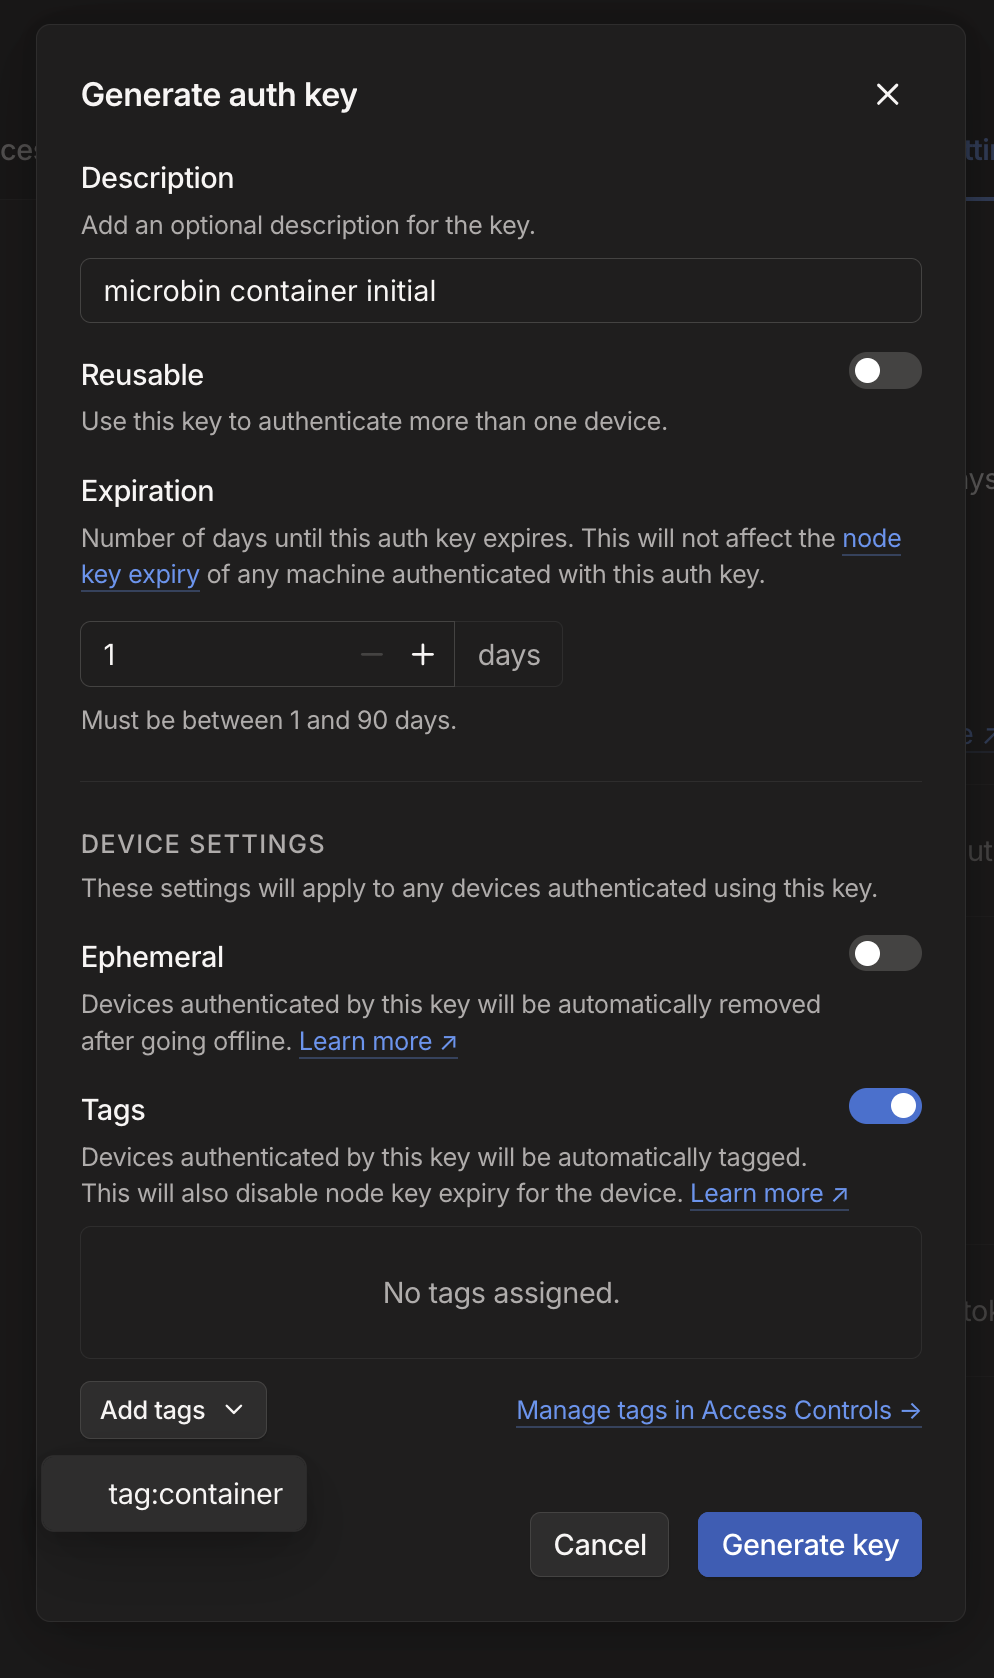
We need to create a key that we are going to use to authenticate the container to our tailnet, for that we go to the Keys settings: https://login.tailscale.com/admin/settings/keys and click the "Generate auth key..." button. You will be prompted for some settings:
Let's go over them to make sure we understand everything:
- The description should be something like "microbin container initial". This is going to be useful so you can see what the key was used for in the user interface.
- Do not set the key to be reusable to authenticate other devices. This key is only going to be used for initial authentication anyway, there's no reason for it to hang around and be a security threat. If you wanna authenticate something else, make a new key the same way.
- For the same reason as the above, the Expiry should be set to one day.
- The key should not be Ephemeral. We do not want MicroBin to stop MicroBin-ing just because it disconnected once.
- The key should have a Tag assigned to it, and it should be
tag:containerwhich we created above. This will make things easier to manage on your Tailnet.
Once you have all of that configured, hit "Generate key" and you will be presented with a cryptographic key that looks something like this: tskey-auth-kZMiSkyrKN11CNTRL-oxD18vMGEXGyD5LZC7CKXGUSxWs6pDHu. Save it in a scratchpad file or clipboard manager, we're going to need it soon.
Dockge/Compose Setup #
Before we make everything work, there's a key tidbit that has to be done: MicroBin is the first container that is going to have real data associated with it, which means we need a consistent place to store it. For this, I personally use the /var/lib/docker-apps directory, and thus recommend the following to set up the directories for MicroBin:
1mkdir /var/lib/docker-apps /var/lib/docker-apps/microbin
2cd /var/lib/docker-apps/microbin
3mkdir data tailscale tailscale/state tailscale/config
Going back to our previously configured Dockge server, we're going to hit the "+ Compose" button in the top right to create a new stack. For this one, the name is going to be microbin and the compose configuration will be as follows:
 1configs:
 2  tailscale_funnel:
 3    content: |
 4      {
 5        "TCP": {
 6          "443": {
 7            "HTTPS": true
 8          }
 9        },
10        "Web": {
11          "$${TS_CERT_DOMAIN}:443": {
12            "Handlers": {
13              "/": {
14                "Proxy": "http://127.0.0.1:8080"
15              }
16            }
17          }
18        },
19        "AllowFunnel": {
20          "$${TS_CERT_DOMAIN}:443": true
21        }
22      }
23services:
24  microbin-server:
25    image: danielszabo99/microbin:latest
26    container_name: microbin-server
27    restart: unless-stopped
28    network_mode: service:microbin-tailscale
29    volumes:
30      - /var/lib/docker-apps/microbin/data:/app/microbin_data
31    environment:
32      MICROBIN_ADMIN_USERNAME: ${MICROBIN_ADMIN_USERNAME}
33      MICROBIN_ADMIN_PASSWORD: ${MICROBIN_ADMIN_PASSWORD}
34      MICROBIN_PORT: 8080
35      MICROBIN_BIND: 0.0.0.0
36      MICROBIN_PUBLIC_PATH: https://microbin.hummingbird-pinecone.ts.net/
37      MICROBIN_TITLE: MicroBin
38      MICROBIN_ENABLE_BURN_AFTER: true
39      MICROBIN_DEFAULT_BURN_AFTER: 10
40      MICROBIN_QR: true
41      MICROBIN_ETERNAL_PASTA: true
42  microbin-tailscale:
43    image: tailscale/tailscale:latest
44    container_name: microbin-tailscale
45    environment:
46      - TS_AUTHKEY=tskey-auth-kZMiSkyrKN11CNTRL-oxD18vMGEXGyD5LZC7CKXGUSxWs6pDHu
47      - TS_EXTRA_ARGS=--advertise-tags=tag:container
48      - TS_SERVE_CONFIG=/stack-config/serve.json
49      - TS_STATE_DIR=/var/lib/tailscale
50      - TS_HOSTNAME=microbin
51    configs:
52      - source: tailscale_funnel
53        target: /stack-config/serve.json
54    volumes:
55      - /var/lib/docker-apps/microbin/tailscale/state:/var/lib/tailscale
56      - /var/lib/docker-apps/microbin/tailscale/config:/config
57    devices:
58      - /dev/net/tun:/dev/net/tun
59    cap_add:
60      - net_admin
61      - sys_module
62    restart: unless-stopped
63networks: {}
64x-dockge:
65  urls:
66    - https://microbin.hummingbird-pinecone.ts.net/
So what's happening here? Some of this might look familiar to you from our previous setup, but the rest of it is quite new.
- First thing that jumps out at us is the weird JSON configuration at the top, its not even the same language as the rest of the file. That's the configuration for Tailscale to use, and it uses JSON, which is manually set up for it inside this file for convenience. This file can be supplied to it in other ways. There are only four things that matter here:
- The port for Tailscale to proxy, 8080, which is where MicroBin is listening.
- Where it says
AllowFunneland its set totrue. This is what tells Tailscale to usefunnel. If it were set tofalsethen this would useserveand only be available on our Tailnet. - Where we use
$${TS_CERT_DOMAIN}, note the double$$. This is not normal for a Tailscale configuration which only uses one dollar sign. However, we needed to escape the dollar sign, otherwise the docker compose file would interpret it as an environment variable. - Finally, take note of the name of the configuration:
tailscale_funnel. It will be referenced as this in other parts of the file (specifically when fed to the Tailscale container).
- The second thing you would probably notice, is the fact that we have a second container, and its the
microbin-tailscalecontainer. This is cool, we're going to run a dedicated Tailscale container just for Microbin to be accessible. note the following:- The Environment Variable
TS_AUTHKEYneeds to be set to the key we generated earlier. - The Environment Variable
TS_HOSTNAMEis set tomicrobin, this is what's going to go in the URL instead of<SERVER>, in our case that's gonna bemicrobin.hummingbird-pinecone.ts.net. - There's a new section under the Tailscale container we haven't seen before:
configs. This is where we place the configuration defined above astailscale_funnelinto a specific file inside the container:/stack-config/serve.json. Please note that the corresponding filename is passed to Tailscale with theTS_SERVE_CONFIG=/stack-config/serve.jsonenvironment variable.
- The Environment Variable
- Then you might notice that the MicroBin container has a bunch of environment variables. They are documented here: https://microbin.eu/docs/installation-and-configuration/configuration/ feel free to go through it as modify as you deem fit. There are two things that require explanation though:
- Note
MICROBIN_PUBLIC_PATH: https://microbin.hummingbird-pinecone.ts.net/, this needs to be changed to your Tailnet name and appropriate hostname. - The environment variables
MICROBIN_ADMIN_USERNAME: ${MICROBIN_ADMIN_USERNAME}andMICROBIN_ADMIN_PASSWORD: ${MICROBIN_ADMIN_PASSWORD}are themselves using environment variables for configuration. These live in the.envfile which Dockge allows you to configure below the main compose file.
- Note
- You may, however, have missed the most interesting part:
network_mode: service:microbin-tailscaleThat's really where the magic happens. Instead of port forwarding, like we did with the Dockge container, we're going to just hand control of MicroBin's networking to the Tailscale container! If you did everything correctly, the result should look something like this in Dockge:
and you should be able to see microbin in the list of Tailscale machines:
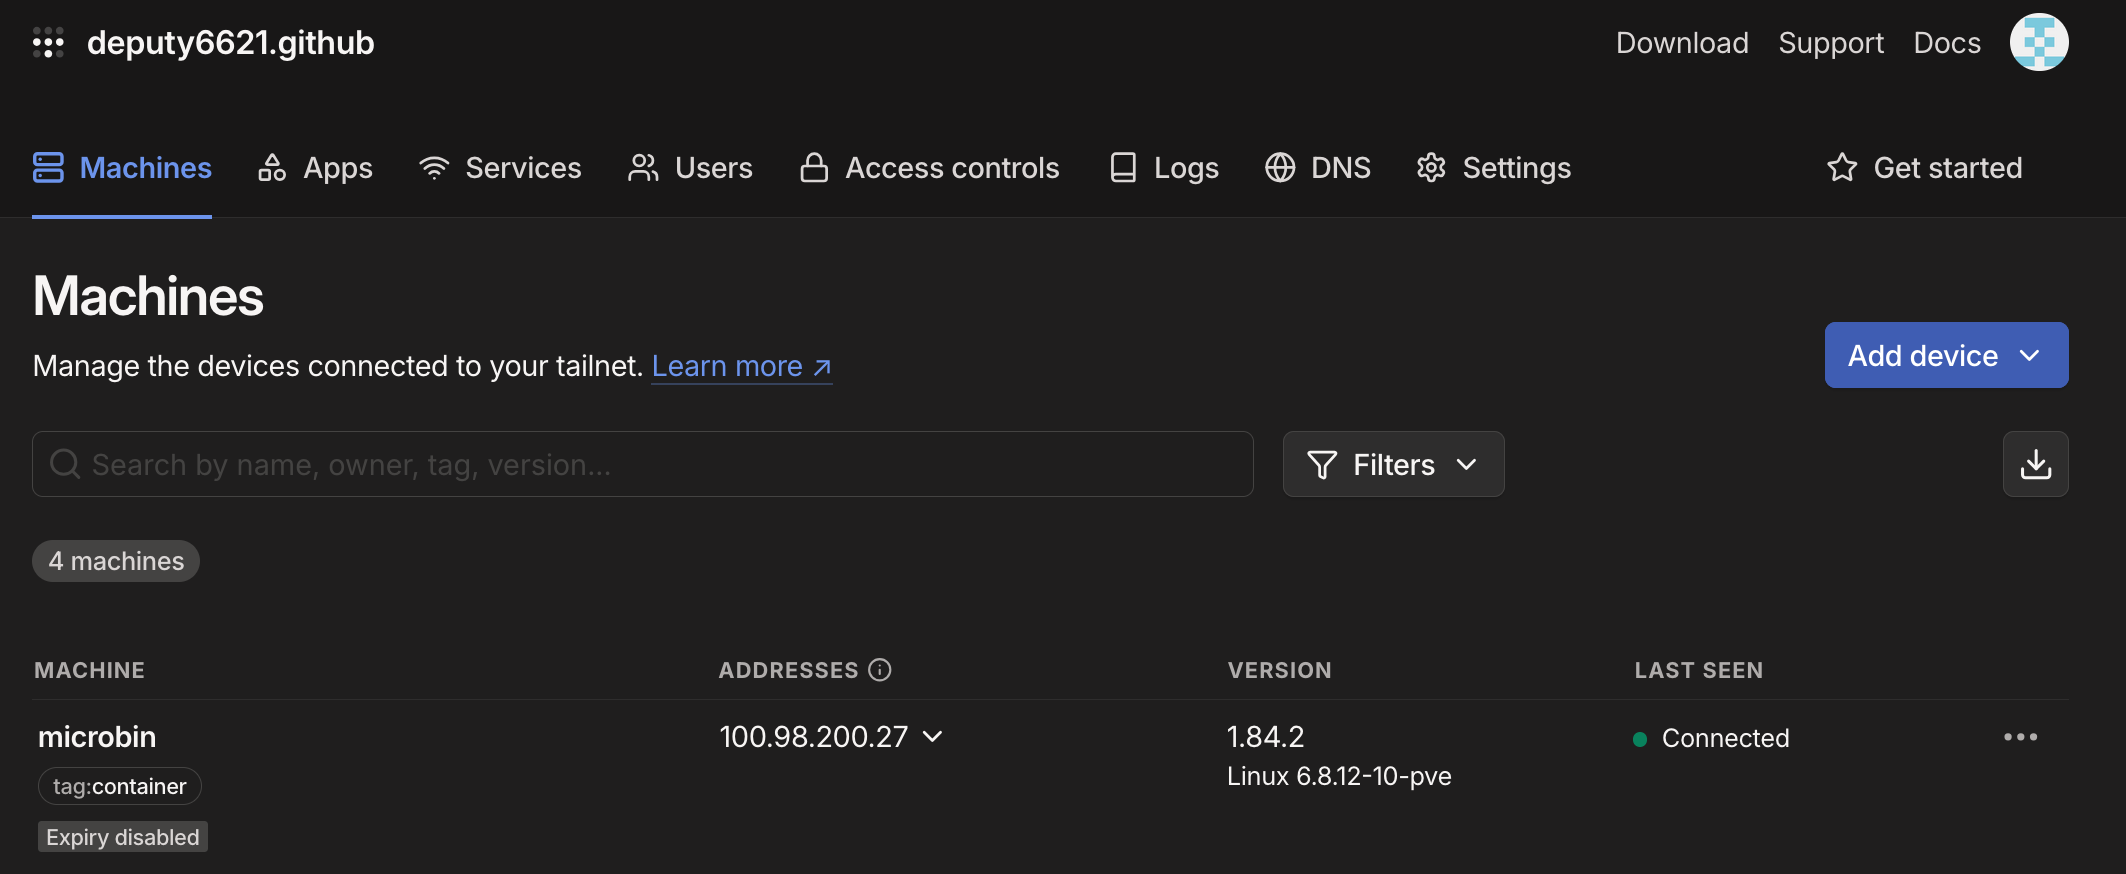
and of course, if you go to https://microbin.<SERVER>.<TAILNET_NAME>.ts.net you will see your MicroBin instance! Critically, this will work everywhere, not just in your tailnet, but be advised that it might take a little bit of time to propagate the necessary DNS changes.
Congratulations! You have started self-hosting your first truly useable web application!
What's Next? #
Now that we have a basic understanding of how to use docker, dockge, and Tailscale together to host something, we can leverage that into hosting many other kinds of applications. Soon, I will be releasing more articles which describe how to host more complex applications such as Jellyfin and Immich, using Homepage for elementary monitoring, and a different way to do external hosting with Cloudflare Tunnels.
Stay tuned!
-
A small note here, we actually can serve other things by giving them a path like
<SERVER>.<TAILNET_NAME>.ts.net/microbinwhich would proxy to microbin, however, many applications will not function properly this way as they are not written for using relative paths. What's interesting though is that MicroBin is written to function this way and this would work, but we're going to ignore that for now. ↩︎